I've said it before and will probably say it again more than once - I hate making the same thing twice. When I had made my first folded peyote earrings, however, and held them next to each other for a picture, I couldn't help but think of a star.
I knew it would take at least six "rays" to complete this star which is a big number for someone who has a problem with even two identical parts, but there was plenty of time for big breaks between making each one, so it would be fine, right? Actually, it was a hard one. To be frank, after the first three elements my motivation to make more was close to zero, but sewing them together and seeing it was going to look the way I had imagined helped a little. For colors I had chosen a transparent emerald with AB finish and a cranberry lined peridot luster. The temptation to use silver lined Christmas green and red instead had been huge, but the sparkle might have been too much. The shiny emerald, however, and the muted cranberry make for a great contrast. I couldn't resist adding a bit of sparkle by sewing on gold lined crystal beads in the shape of stars on the centers of both sides. To hide the hole in the center, I used black Austrian glass pearls with one of the golden beads.
And here it is, my folded peyote star ornament. Although I really like the result, I don't see myself making another one of those again very soon! ;-)
At the time of writing this post, I hadn't been working with wire a lot, thanks to recurring pain in my thumb joints which makes it hard to hold a piece when wire wrapping. I felt I had to make at least one wire ornament for this calendar, though, and since wire knitting is the easiest on my hands, I decided to make something that had always been on my list, but kept being forgotten. So many things to try out!
I had put knitted wire into knitted wire before, in a bracelet, but I had never done it in 3D which was actually rather fun, so it's not off my list yet because there are so many possibilities with this!
It was not that easy to take a picture. In this one you have to have a lot of imagination to notice the inner structure.
So I took a second one holding the ornament up against the wall, so you can see the inside. As for the weird effect, that was just to remove the wallpaper and my hand. Unfortunately, the ornament cannot do this ray thing. A pity, really. That would look cool on the tree ;-)
Remember that, in the Kimekomi post, I told you about the fabric leftovers I got from my sister and that there was also some metallic blue leather in the bag? I immediately had a plan for it as it reminded me of my favorite bead color. Another night time scene, yay! You will see, however, that I really held back and only used it as a rather subtle outlining because I didn't want to make the ornament too large. It also brought back a memory from when I was about 15. Jeans and sneakers, a white men's shirt (not tucked into the jeans), a costume vest (wool striped in grey and black) and the pièce de résistance - a bow tie pin in, I swear, just that metallic blue that I often took off several times before I got it to sit juuust right at the collar. That was also the time of slim leather ties. Actually I went to the job interview at the library dressed like that a few years later. Boy, the 80s, what a time.
Back to my blue leather. I had never done bead embroidery on leather before and wasn't even sure if it would work because I didn't not have special needles for leather. I was prepared to have one or the other beading needle break on me as the leather is not of the thin kind, but luck was on my side although I did need my pliers every, now and then to pull the needle through completely and embroidering went slower than it would have with a different base.
My snowman looks rather classic, I think, made up of three sizes of "snowballs" on top of one another. I gave him a blue mix scarf with fringe and then noticed that his mouth was obviously hiding underneath because there was no way I could get a whole face on there now if I didn't want to use small beads for the eyes. For the eyes and the buttons I used O beads. I could have used the other side which is black like coals, but it's hard to resist a beautiful AB finish. His nose is an orange dagger bead as I didn't have a short spike bead in a good color (I used red ones on my bauble snowmen a few years ago, but didn't have any left). The dagger bead works rather nicely, though. Last but not least I gave him "branch" arms beaded from a matte metallic seed bead mix I had in my last surprise order. I thought about adding a broom as well, but didn't want the ornament to hang crooked because it had more weight on one side.
I used the same leather for the backing, but refrained from adding an edging this time, not sure if my needle would have been able to deal with a double layer. Instead I used my silver metallic pen to cover the black showing and added small silver dots on the leather in front and in the back for a festive look.
I'm happy about how my little snowman turned out. Although he doesn't have a mouth,
it still seems to me as if he's smiling which may be due to
the tiny gaps between the beads that I sewed on in circles. Also it looks to me that, with his arms open like this, he just seems to be waiting for a hug. I'm sure there will be some critters visiting him during the night :-D
Deck the halls with boughs of holly, fa, la, la, la, la, la, la, la, la 𝄞♫𝅗𝅥𝅘𝅥𝅯 It's one of the carols I love, but I had never looked up its history. Obviously its origin is a Welsh winter carol with the name "Nos Galan". Its melody is dating back to the sixteenth century, but the English lyrics were written by Scottish musician Thomas Oliphant not before 1862! If you are interested in more detail, check it out here for example, The Hymns and Carols of Christmas. Those first lyrics still had a lot of drinking in them which got lost in later versions. I wonder why, there's nothing wrong with a little drink on Christmas, is there?
What is a bough of holly, though? The holly is a shrub-like evergreen which can grow up to the size of tree. Holly leaves grow from rigid limbs which, when cut, are called bough of holly.
There are different tutorials for holly jewelry or plants on YouTube, but I didn't want stylized leaves from a few beads. No, I planned to bead some leaves in brick stitch and started with making a pattern for the bigger leaf.
My holly is of a transparent emerald green, a beautiful color with AB finish. I decided against adding the fine yellow veins that you see in some of the leaves, but I added yellow beads for the spikes. And then, because that's the way my brain works, I sewed on the center vein after all. That looked wrong without some of the side veins, so I added a few of those. The next day, I had another good look and cut all the veins off again. There is some useless thread hidden away in that leaf - and some wasted time, but it was still the right decision. nb cvx ws - I have no idea what that means, but it's the opinion des Dekans on the matter. Any of you speak Cat?
I had to take a break before being able to tackle the second leaf (that was also the point when I abandoned the idea of three leaves) because my thumb arthritis started acting up. In the meanwhile, the search for the perfect red beads began. I wanted them to be shiny, not too dark, not transparent, not faceted of course, the right size, and I didn't want a whole strand only to use just a few beads. So I looked at wax pearls, glass pearls, stone beads, glass beads, acrylic beads, and finally was lucky to find so-called miracle beads. The description say they are plastic covered in resin which makes them lightweight and durable. I hadn't seen them before.
Waiting for the beads to arrive, I started on the pattern for the second leaf, smaller to make it more natural. My 10th class art teacher would like that, but hate the fact that I made both leaves symmetrical just to make the counting easier. "Nature isn't symmetrical! Put more crooked branches there." This was my 19th project with some of the bigger ones still ahead of me, my motivation was wavering. Had it been the first, I'm almost sure I would have gone for asymmetrical leaves. The second leaf ended up being a bit smaller than I had planned and for a few moments I contemplated making a third one after all. Then I thought of the projects waiting. So instead of making another leaf - and I actually had opened the pattern again already - I sewed up the ends of the leaves and hoped for a quick arrival of the beads. They were in my mailbox the next day and I was really happy when I opened the envelope, color and shine were perfect.
My first attempt at sewing them on, however, was pathetic. I don't like if I see too much thread on the sides, and with the beads being 10 mm, there was too much thread for my liking which I couldn't cover up. Rip, rip, rip - can you imagine how desperate I was by now to get this ornament done? The second time around I didn't sew the berries on side to side, but did it like in a fringe, went through the bead, added a seed bead supposed to imitate the bottom of a holly berry and went back through the berry bead and into the leaf again pretty much in the same spot I had come out of. Much better! I could finally see the light at the end of the tunnel.
Last but not least, I bent both leaves to make them look a little more natural and stiffened them in the back.
Do you see now why I like the berries? The description also said that in light it looks as if you can look inside the beads although they are not transparent. It's quite fascinating. Unfortunately I didn't manage to capture the effect well in the picture as the Christmassy shine was even stronger, so you will just have to believe me it's there.
There you go. Despite all problems I am now ready to deck the halls - with one tiny bough of holly ;-)
Wanna have a little extra? How about Annie Lennox singing "The Holly and the Ivy?" So beautiful!
Can't do Christmas without a Christmas tree, can we? In 2016, I made this pair of mismatched earrings with a very shiny tree in seed beads.
But can we put a Christmas tree on the tree? Of course we can, if only because I had enough beads for one, but not two of them. So obviously it had to be an ornament for the calendar.
This time I used matte dark green Delicas which are more realistic than silver lined beads - and happened to be part of a surprise bead order, just perfect - but in order to create the shine of the season, I turned semiprecious stones into baubles and added gold seed beads. My tree comes with its very own pot. It's from dark blue hex beads with seed bead and Delica embellishments.
Would this qualify as a happy little tree, what do you think?
Definitely one of the cutest Christmas ornaments (which you could also turn into a charm, a pendant, or earrings) that I found on YouTube is a little nutcracker by Juliet Erskine Jules and Rose.
I have to admit that the video tested my patience. You know that I have the attention span of a gnat when it comes to videos and this one was an hour long, but I was so intrigued not only by the cuteness of this little fellow, but also the generosity, which Juliet is sharing these instructions for free with, that I couldn't do anything but pull it through, right? And that's what I did although I got confused a few times which was not Juliet's fault at all.
She shows and explains every step, but I did get distracted by a (not so) little cat every, now and then who insisted on climbing the hills that are me. It was never a problem to save the project, though, by just going round once more to find the right bead to come out of, for example. Another thing was that I had to improvise on the hat as the pearl I used seemed to be a little bigger. This is an intermediate beader's project, however, so I had been ready to improvise. The hat is a bit different now, but I think it still turned out nicely for my dark green haired nutcracker. Yes, he's ready to work at the Emerald City with his green hair and coat now. Seriously, though, didn't he turn out cute?
Now
I wondered if I could also make a slightly bigger nutcracker, adapted
to my personal skills, meaning mostly using my beloved Herringbone and a
bit of Peyote stitch. Turns out I could, not without flaws of course and with some trial and error. What
bugs me most is that Magatamas fooled me once again. This is a kind of
bead that I will never get along with, and the only reason to use two of
them for the shoes was that the last surprise bead order had contained a
tube. I had turned them this way and that way several times and still
managed to get the wrong side up on one of the shoes. Now I can't stop
looking at it. How is it possible that I only noticed when I was already up at the chest?? Ripping everything out again was not an option for me at that point.
I changed a few small things in the design as well, like the medal on the nutcracker's chest, for bravery, no doubt, because he was very brave to let me work on him ;-) I also gave him white hair and a beard. His coat is either very long or his legs are a little short, but that's okay, I'll keep that in mind in case I make another one (actually I did start one and messed it up royally).
What I want to make clear is that I would not have been able to make this version without Juliet's pattern.
Without it I wouldn't even have thought of making a nutcracker, and if I
had, I wouldn't have known where and how to start. Thank you, Juliet!
Nine years ago I talked about the history of the Christmas tree on this blog and how, before the invention of the glass bauble, sugar cookies, "Springerle", apples, and nuts were the choice of decorations for the tree.
Of course my first thought was to make some Springerle of my own, after all it's a custom still held dear in my area ... but not by me, and it was a very short thought and very long and loud laughter afterwards. I don't bake and not even the baking members of my family have ever made Springerle if I recall that correctly. That also ruled out the sugar cookies. I would probably have eaten them instead of hanging them on the tree, anyway. So apples and nuts it had to be. I scrounged some walnuts off my neighbors and went to the old garden/deco/crafts shop here in town and got myself an artificial apple (just one for starters in case it didn't work out). My plan for the walnuts was to "gild" them using a set I had on my birthday wishlist (just to show you how early I've started preparing this calendar, there's six months between my birthday and Christmas and this wasn't my first project), the plan for the apple was something in gold wire, beads, maybe pearls, inspired by the Snow White apple I had made for a customer some years ago.
The project didn't start out too well. The nuts didn't only open along the two halves, but also had grooves through both halves that started opening up. After preparing the first nut - opening it, glueing in a wire and putting the halves back together - I noticed a crack on one side. No, it hadn't been I, the nut practically came apart just from my looking at it. As I still had the glue in hand, I put a little on the crack hoping it would be okay.
The next day I started with the gilding. If glitter is the herpes of the craft world, leaf metal is at least its little brother. I may not be a natural at this on non-flat surfaces ;-) After a little cursing because the nut kept slipping from my fingers, I had applied the gilding milk, let it dry and put on the gold. If I mention glitter, that is due to gold leaf flitters settling on my floor, hands, and table when I brushed off excess leaf. I put the nut on a hook, so the gold could dry. The apple was a bit more difficult as I had to turn it in my hand while applying the gilding milk (which is really sticky!) and later the gold leaf. Other than the nut, I didn't gild it completely and added specks here and there to give it a vintage look. The next day I put on the layer of varnish to protect the gold. That sounds easier than it was (non-flat surfaces!).
Some time later, I finally ordered some gold wire that I had run out of (fun fact, I hadn't and the gold wire I ordered had a completely different hue than I could tell from the picture, an absolute no go) and prepared to open the other two nuts, so I could get this project finished. Ha! One of them put up such a fight that it ended up in the trash. There were cracks everywhere, just not along the seam (can you call it that on a walnut?). The last one went apart in three pieces, but I glued it together and quickly regretted even trying. No idea why because the process was exactly the same, but some spots on that nut kept repelling the gold leaf. It did give it kind of a vintage touch, an old inherited nut. Maybe I could add some old ribbon to enhance that look? My brain started ticking while I put on the varnish. Guess what, the varnish turned green in the spots where I had very carefully placed it on a glass container to dry all the way - of course only after the varnish was dry to the touch - and at the bottom, but only there. I don't have the slightest idea why, but what I knew now was that this nut actively hated me, and even if it sounds very silly, I hated the nut right back.
When my gold wire arrived, it was time to think of something for the apple because of course - and I'm writing this with a big eyeroll - I had to put my extra touch on this. Even though the hue was wrong, I started crocheting a disk as a base, but after a few rows I knew it just wouldn't do. Maybe I had some red wire left in one of my tins? Wait! Was that gold wire? Turned out the color was good, but the gauge was wrong. I started tiring of this project that seemed to be fighting me all the way, but still didn't want to settle for a speckly gilt apple, and then I remembered the pearl pins in my supply drawer. They had been meant for something else that got put on the backburner and the pearls were rather big ... the biggest snowflakes you will ever see on a Christmas apple ... it started to look like a mix between a fly agaric and an apple .. and know what ... I didn't care anymore. I added a red ribbon and declared this project to be finished, if I like the outcome or not. (I hate it.)
Let's end this on a positive note, however. At least the first nut turned out nice :-D That's your reward if you made it all the way to the end. Thank you for bearing with me, I felt sometimes you have to talk about your fails as well.
Mittens have been around for a very long time, for centuries if not millennia. Have you ever wondered how many mittens may have get lost over that time? They are so easy to lose! I can't say how often I have seen a single mitten on the spike of a metal fence, on a ledge, on a post, patiently waiting for its significant other to come back. A single mitten looks very lonely.
My mitten also seems to have lost its mate, how sad. It will have to wait if the second one turns up somehow, but I doubt it.
I bead embroidered it in stripes of different colors to make it look as if it were made from leftover yarn. There are childhood memories coming up when looking at this, I can tell you!
Sometimes I really wonder if it has become worse with age or if I was simply born being geometry challenged. It sure isn't a time at school I am thinking of fondly. As I had made two part pod earrings before, however, I figured I would be able to make a pod from three components as well. There are beautiful pod patterns out there, but I wanted to make my own. Nothing too big or complicated of course, after all I had to make three components.
So I played around a bit and drafted a little Christmas tree in a pot, with lights on the branches, a golden star on top, a garland all around, and baubles. The plan was to put the same pattern on every component, but change the colors for the garland and baubles - which would be nice for using up some stash.
After the second component I got bored. It was probably not a good idea trying to push it through, I messed the third one up royally. First, I ran out of the blue mix I had used for the other two, but I just couldn't be bothered to put in a bead order just for a few blue beads, and no one would notice the change in the background, right? After all, this was just a small pod for myself. Second, the spirit bead - a wrong bead used on purpose because only the gods are perfect - in the garland wasn't so bad. Only it was not really a spirit bead, I just had missed it, it had been the middle of the night and I had been already bored and slightly annoyed. One wrong bead wouldn't show, would it (especially not in a sea of different blue beads). Then came the real whopper. Although I thought I had checked very thoroughly, I had made the wrong halves and only noticed then when getting ready to zip up the last piece. As loud laughter of a madwoman is usually frowned upon by the neighborhood at 1.30 a.m., I took a deep breath and put everything away.
The next day I gave it another try. Success! Now I just needed to zip it up and ... what was that? A one bead bauble in the first component I had made?? Why hadn't I noticed that before? I was so ready to chuck this whole thing, but I had come too far already. So I broke out the two wrong beads very carefully and added the right ones. So far, so good. Just zip up the last piece and ... why do all the pods I see always look so nice and smooth and full and mine looked, well, not wrinkly exactly, but just not as nice? Did I have to stuff it? Was my tension wrong? I really had it by now. This was no fun anymore at all. What would it look like if I just squished it? It was strangely satisfying to do so, probably because I let all my frustration out, and to make it stay that way I even sewed the parts together in a few spots. It's no pod, but it actually looks quite cute.
This had not been the plan, however. Incredible but true, after all this hassle, I decided to make a second pod and stuff it. An easy pattern, not taking chances this time. Another little Christmas tree based on the last one, only symmetrical and no different colors for each component, either. No snow and just a different background color for each side. I was so sure it would go wrong again otherwise, and then I would have to drown myself in the Fils, our little local river.
I know that you are now burning to know if I managed without mistakes the second time round and I'm happy to say ... no. You hadn't really expected me to say yes, had you? ;-) I had to break out a few wrong beads again, but at least I know how to do that instead of having to rip it all up!
All sides.
And this will show you the difference of the backgrounds a bit better.
I doubt there will be another pod soon, but who knows? After all I said the same things about the puffy stars.
The Christmas pickle - honestly?? Yes, I finally gave up and made myself a pickle ornament. For those who haven't read the story on my blog yet and don't understand what is so exciting about this, see this story from my very first advent calendar.
Actually I still don't know any Germans in person who celebrate this tradition. In
a silly mood, however, watching old Sherlock Holmes movies with Basil
Rathbone on TV (which has absolutely nothing to do with anything except
that I measure the time I need to make something in the length of movies
or other TV programs), I started poking some roving and it happened to
become a pickle shape which then happened to get embroidered with green
and dark teal silver lined seed beads. That's how things go sometimes! Bead embroidering a needle
felt shape two beads at a time takes a lot longer than it sounds, but
now I'm the proud owner of my personal one of a kind Christmas pickle
;-)
What is Kimekomi? A Kimekomi doll is a traditional Japanese doll originating from Kyoto (follow the link for more information). Kimekomi means "tuck into a groove" which refers to the technique used to dress the doll. Its body is carved from soft wood and has grooves. Fabric pieces are cut and applied to the different segments by tucking their edges into those grooves. Somewhere along the line, someone used this technique to make tucked fabric balls which was made even easier with the appearance of soft foam pieces, balls, eggs, cones, into which you can cut your own patterns, simple or complicated ones. I never learned how to sew, so this sounded like a great little project for the advent calendar.
There are many tutorials on YouTube for this technique, I chose this one by Miranda's Ornaments because it shows the very basics. I used a bigger styrofoam ball because it was already marked at the ends which made it very easy to cut the grooves without even having to draw the lines on. My only tool was an old kitchen knife whose blunt side I could use for tucking in the fabric, being very careful of course, so I wouldn't cut my finger too much with the sharp side - that I could have taped up thinking about it now ... Well, I survived, the blister on my finger where the knife handle rubbed against it is also gone by now, and although it took me longer than expected because I struggled with the measurements of the fabric pieces, I finally had two very colorful ornaments. Being a smart Swabian with very little trust in my crafty skills, I had resisted the urge to buy fabric and asked my sister if she had some leftovers for the first attempt. She gave me all kinds of fabric, from purple t-shirt material to metallic blue leather, and a wild pink, red, green, orange, yellow, and golden fabric with perfect stretch for tucking. I made one ornament just from that fabric, for the second one I alternated it with yellow organza onto which I sewed sequins. Of course they looked more like summer than Christmas which is the reason for my not showing them here, but now I felt confident enough to use the silver striped satin that had been in the bag. Instead of six segments, I made twelve now by also cutting a horizontal groove all around, and kept turning the fabric, so the stripes would go into a different direction in each segment.
I had ordered some silver/black cord to cover the grooves, but didn't use a hot glue gun like Miranda. Not only do I not have one, but given my relationship with glue, handling hot one doesn't sound like a good idea, anyway. Instead I used a different glue and also pins to make sure the cord would stay in place. As you can see, the stars that I used in the pokey bauble are back again, in silver this time.
Of
course you can use what you like, beads, ribbon, lace, glitter,
sequins, and whatever else you can think of, to embellish your ornament. You
can make it in a rustic or fun style, crazy or elegant with velvet for
example, use pins with pearl or rhinestone heads, in a simple pattern
like me or a more elaborate one.
Give it a try, if I could do this, I bet you can even do better :-)
Last year I found a YouTube tutorial for the cutest little angels. I had already picked all the topics, so I didn't include the angels in the advent calendar, but only shared them on social media. You can find Krístina's video here. She speaks Czech, but shows everything so clearly that you won't necessarily need the commentary if you want to try making the angels. I didn't need it. I also improvised a little by using the supplies my sister and I had on hand which, for example, meant replacing SuperDuos with Twin Beads from my stash. I made a few for my sister and myself to give away, and they were so well received that my sister then made a bunch more.
This year, however, I wanted to try something else. Do you remember the puffy stars from the last calendar and that most of them were made from five components? Well, the components (that can also be used as bails) reminded me of wings (not just me, I'm sure), and I wondered if I could design something around one of them. My first attempt didn't work out, but I put the wings aside in the hope for an epiphany sometime later. That epiphany came a few weeks later after stumbling upon the pearls that I had also used for the mistletoe as they were about the same size of the pearls my sister had given me for the angels. I also used the wing idea in other pieces then like Count Catula. I wanted my new angel to be rather classic and therefore decided against a bronze Twin Bead robe - the only color I still had left. Also I had been working from a box with my latest seed bead order which I still hadn't put away, and a few colors I had added to the box (because that's how my muse works), and eventually it had become a bit of a personal challenge for a while to make something only with beads in that box. In the end, the obvious choice was the same pearly white as in the wings, in a flowing Herringbone robe. Have I mentioned before that I love Herringbone? ;-) There was also a tube with only a few golden beads left and they were just enough for a halo and two - uhm, buttons?
I didn't mind the Twin Bead angels having no arms, but with this one's wings being in the back, I definitely wanted some sleeves here and I am pretty happy with my solution for them. I can't help thinking, though, that somehow this little angel looks as if waiting for instructions!
The puffy star is back! It all started with a large tube of bead soup, at least ten years old. I know many beaders hate bead soup, but I'm Swabian, and throwing beads away would feel like ripping my heart out, especially Delicas. I couldn't think of anyone to give it to, either. It was easy enough to pour out the whole soup and pick out just the beads needed, though, mostly clear ones in this case. Bead soup doesn't scare me.
At first I had wanted to try something that didn't work out the way I had hoped, like so often, so I ripped it up again and made a winter comet instead, or maybe an ice comet.
The web tells me that comets have two main tails - gas and dust - and a coma. Well, this comet has a baroque pearl and quartz tail because gas and dust are very hard to make from beads. Also a comet doesn't look like a puffy star, but artistic license and fantasy do wonders. Just don't tell NASA about it.
First let me say that for me candy canes have never been a part of Christmas although I knew about them of course. Spontaneously I can't even remember ever having seen one in person although they are surely sold here as well. Nevertheless - or maybe therefore? - a candy cane seemed a good choice for an ornament.
There are probably loads of beaded candy cane tutorials around, but I felt confident about not needing one of them. As a technique I chose my beloved Herringbone stitch with a round of eight seed beads each although I knew the curve at the top would look squished and weird if I tried to keep the rope round. Four seed beads would have been better, but too small for an ornament, at least for my liking. Even if the cane is flattened now, it still looks good - that's just my personal opinion of course. To distract from the shape a little, I chose to add a small beaded holly bow. What do you say, does it work?
You never stop learning. I have never seen the TV show The O.C. and had therefore never heard about Chrismukkah if any of you should wonder. The first time I actually stumbled upon this word was on a site not TV-related, that of the Jewish Museum Berlin which had a temporary exhibition on the theme from October 2005 to Januar 2006 called "Weihnukka - Geschichten von Weihnachten und Chanukka". As there still seems to be interest in the topic, they put up a page with the key content which is also available under the English name "Chrismukkah - Stories of Christmas and Hanukkah". Obviously the concept of combining both holidays - and giving this a name - had been created by assimilated German Jews in the 19th century. Via another article on Hey Alma, I got to a blog post by Jim Wald in The Times of Israel which touches on the question of assimilation and the consequences for the Jewish community in Germany. As you can imagine, the idea of "Weihnukka" disappeared when the Nazis took over. And then it was re-introduced it thanks to a TV show? No. I found at least one article about it before the show even started. Do you have a story to contribute, maybe from experiences of your own?
There you have it. I promised you a crafty advent calendar and sneak in another story, but I had warned you this could happen. Let's get to the creative part now. Today's piece had been in the planning and making long before I jumped into the rabbit hole of Chrismukkah. For months, the title of my draft read "Hanukkah!!! - The seventh door (Star of David???)". A Star of David seemed achievable, but my own ideas were boring, YouTube didn't give me anything I liked, and most Google results didn't convince me, either. I kept putting this one off until after my first folded peyote pieces. Then I remembered a tutorial by KrisDesignFSP on Etsy from my first search. I didn't follow the tutorial exactly. As you can see, I used two different colors for the both sides, but no different "edge" color, and I made the star smaller, both in width as in length, because I wanted to give this to a friend, as a pendant, should she want that, or for use as an ornament. It was also important for me to ask her if she thought this was okay to show here. The blog post mentioned above also provides links to articles on other Chrismukkah related things, such as the Hanukkah bush, by the way. That I had also never heard of. I doubt my friend has a Hanukkah bush, though.
Of course my first attempt was too small. I couldn't twist the peyote, combine the triangle, AND zip it up. My second attempt was slightly bigger, but while the zipping up was not a problem anymore, stitching the triangles together wasn't so easy. You may notice that the star is not completely regular, but my friend is a very sweet lady and likes it as it is, phew! I don't think I could have done a third one ... although it was close as der Dekan actually opened up the cardboard box to steal the star. I caught him just in time, the furry little thief! ;-)
My first try didn't go to waste, by the way. I turned it into a pair of earrings.
Saint Nicholas Day! Of course I have told you of our tradition of this day before - here I wrote about the legend of the bishop Nicholas of Myra, and here I have talked about chocolate Saint Nicks that often end up in shoes on December 6 over here (actually even I still get some each year!).
So this year I can concentrate fully on the crafty side today. No shoe, no good ole St. Nick, no, I am giving you an actual bishop! It's not a full one, though, because that would have taken me too long and I wouldn't have had enough bugles which I only used because they happened to be in the box next to me while I would have had to get up to fetch the seed beads, and that was completely out of the question because of the cat sleeping on my legs *taking a deep breath*
I see our bishop's little flaws - the very high mitre and the big amice (but hey, maybe he had a neck and shoulders like a bodybuilder? ;-)) - but all in all, I'm fine with how he turned out, and look, I haven't even forgotten his crosier!
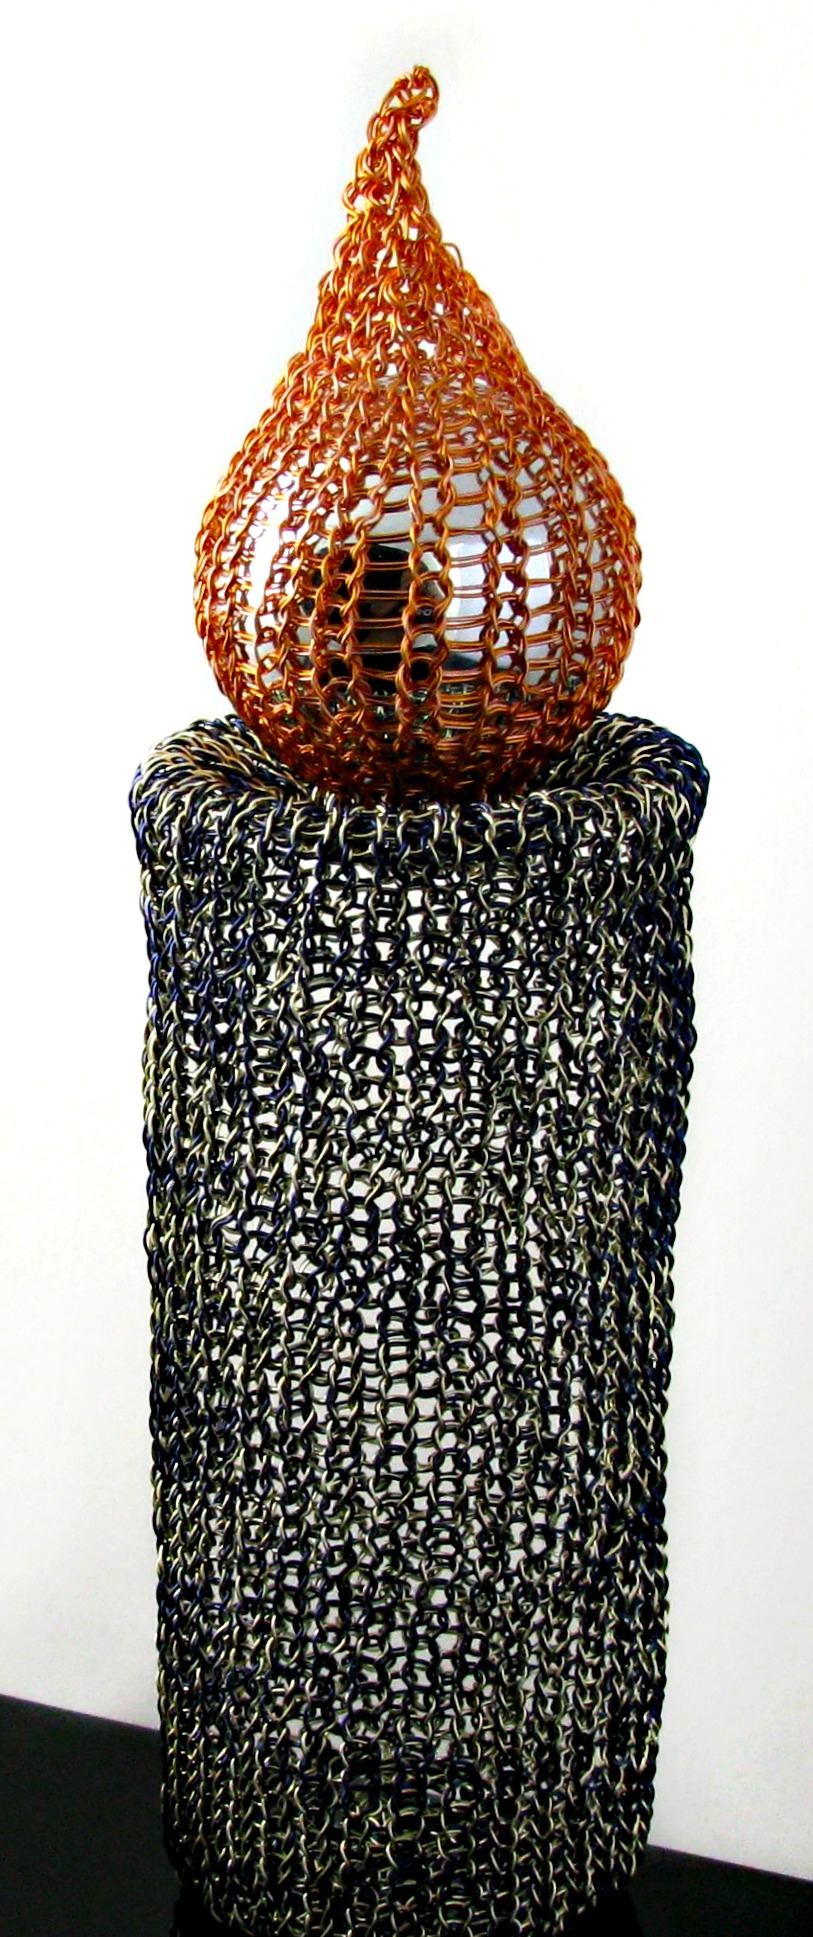
I own real candles, but can't remember when I actually lit one the last time. I never trusted (some of) my cats around open fire that could be knocked over. The two candles on one of my cupboards are constantly crooked because one or the other tail keeps hitting them. So instead I have fake candles with a wax surface and LED "flames". When I started wire knitting, I also gave some candles a try. The long ones that I made first are difficult to put up because they tend to bend over, wire crochet would probably have been sturdier. I also made a bigger one that stands well on its own, though, as it is wider and made from two wires. To make the "flame" shine, I put a small Christmas bauble inside. These pictures from a previous advent calender give you an idea of its size.
This time, however, I wanted a beaded version. I used 8° pink lined crystal seed beads to bead around a small wooden dowel in peyote stitch. Two layers of metallic golden seed beads and a disk at the bottom make up the little candle holder (actually I had run out of the pink beads and had to think of something, but this is supposed to be a bit of challenge after all). A flame of red and a very light transparent brown and voilà, here's your Christmas candle! It can stand on its own or can go on the tree.
I told you this would be a crafty advent calendar and that means there will not just be beads which sounds a lot easier than it is for me. To be honest, I have never been the crafty type. Whenever I think of crafting, the first image that comes to my mind is me sitting at the parish hall, around nine years old, glueing wooden clothespin halves together to make a coaster, and hating every second of it. If I'm not completely wrong, it was the only time I was at that crafting circle.
When browsing through YouTube tutorials for the advent calendar, however, I was glad to see a few that seemed right for my limited skills. Among them were sequined ornaments. I didn't use a particular tutorial because the basics are actually rather easy. You take a styrofoam ball and pin your sequins on, in whatever way you like, striped, in swirls, combined with glitter or other embellishments ... or you can do it like me.
Doing it like me means that you take a small ball and pin on sequins in waves. Then when you are finished - you have to finish it or you won't bite your table later which is essential for the end result - you decide that you do not like that at all and take all the pins out again. Which takes a little time, but isn't that difficult because you have chosen not to use any glue with the pins (which you don't necessarily have to do, but suddenly it seems safer to you).
So you start all over again, but because you are an idiot, you use a bigger bauble this time, make a few stripes between the "poles" and then despair because the still empty surface seems endless. Because you have small sequins which will take you weeks to put on. Which you could have known beforehand. Doh. At that point you may get a little dramatic and then think about ordering huge sequins. But wait! You have stars, tiny, small, and bigger ones. That will go much faster, won't it? It might have if you had taken into account that those stars have no holes which means you have to poke some into all of them first. With the tip of your scissors because you couldn't find your pokey tool, and because you only remembered now when writing this post that there is one in your needle felting box ...
This is a tale of poking. You poke the golden stars that you try to pick out of the baggie while the silver and black ones, especially those tiny buggers, stick to your hands and refuse to come off again easily. You have to poke the pins through the stars because the holes make it easier, but are still not big enough for the pins. You dip the pin tips into glue and then poke them into the bauble using the back of your pliers as you still don't own a thimble.
After a while I got into a kind of meditative stupor until I ran out of stars. The forced break while having to wait for more stars to arrive was probably good for my hands and arms. This ornament has about 5 million pins in it which makes it weigh about 100 kg, but maybe it just feels like that to me ;-) It would bring any Christmas tree down. And it's pokey because of the tips of the stars, hence the title. It really sparkles like crazy, though. Mission accomplished, but believe me, this one will stay one of a kind.
Oh,
and a little extra tip, don't store the bauble in a drawer together
with something needle felted or you will picking off fluff forever!