5/29/2021

Miss Francie Bennet - Part 2, The accessories

Welcome back!
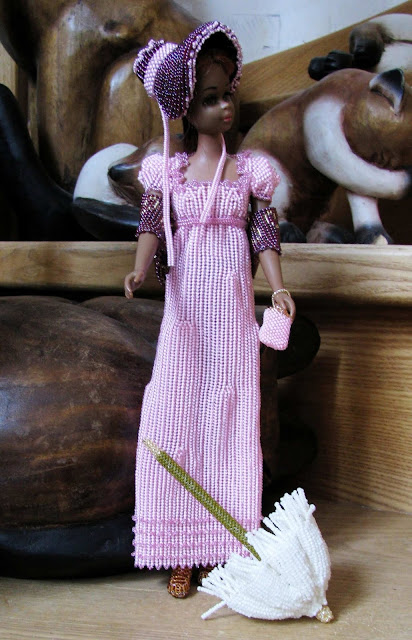
In this post I want to talk about the accessories for Miss Francie Bennet - the 60s doll who has been thrown back into Regency times.

As always I had no definite idea which accessories I would make when I started this project.
Of course I knew Francie would need a pompadour, almost all of my dolls get some kind of purse or tote or handbag, except the first two Flappers.
She would also need a hat, that was the part I was afraid of the most because I had no clue how to make a Regency bonnet.
And for going out a shawl would be nice.
That was as far as I planned ahead.

As my big JaLa loom is still occupied by a WIP that I'm not sure about anymore, I decided to use one of my small looms for the shawl. After some quick measuring I figured it would be just big enough for the triangle shape I had in my mind.
It was close, very, very close. In fact I wouldn't have been able to finish the shawl if I hadn't opted for the triangle because I almost ran out of warp space at the bottom.
What I also had not taken into account was that glass beads are heavy and loomed items very slinky. The shawl slid off Francie's arms at the slightest movement, so I had to put in a few stitches to secure it.


Then I suddenly had the idea to give her a parapluie, obviously because I believe in punishing myself.
My test piece was bead embroidered, but the shape reminded me of cocktail umbrellas, so I had the idea to make strips in Herringbone instead, sew them together and, well, wing it from there.
The little parapluie has nine strips which I sewed together on the inside and extra at the ends to emphasize the seams. A little hole which I wanted to use for the shaft remained at the top. So far, so good, but of course this construction wasn't completely firm. I took a deep breath and put glue all over the outside and inside to reinforce it. That sounds easier than it was, of course it got a little messy. Glue and I - the endless story.
In the end, however, I had a nice firm structure, yay!
I added fringe all around and finally the shaft (for which I beaded around a wooden skewer like for the Fairy Queen's staff) with a golden end top and handle. Voilà.
Francie can't hold this parapluie because she can't grip it and she can't bend her arms, so the plan is to either just put it in front of her or maybe add a strap, so it can dangle from her hand.


After this exhausting part of the project I needed to make something small, Francie's pompadour.
There's not much to say about that, you have seen variations of it before.


I had saved the biggest challenge for last - the bonnet.
Two things were clear. It had to be built up from several parts, and to make it sturdy enough, it had to be bead embroidery.
I looked at all kinds of Regency bonnets and explanations. Of course soft crowned ones were out of the question for me as I don't know anything about embroidering on fabric, it had to be the stove pipe kind.

Then I tried to keep everything that I had seen in mind and cut and bead embroidered three of the parts, sewed them together and glued on the Ultrasuede afterwards. This is a very short description for what took me a few days with the sewing and glueing being most difficult.
I also added some wire to the front part which helps to shape it, well hidden under the Ultrasuede.

The fourth part was even harder to deal with because I had to embroider it first and then glue it to the "stove pipe" as it would have been impossible to do that from the inside. There was no way to hold the glued edges together, it would have needed tons of pins to keep the shape. So I had to manage with my fingers and finally it stuck on the way it was supposed to. After it had dried, I added some pink lace on the back which also served to support the glued edges.

The last task was to sew on two rows of lace at the front, a ribbon around the stove pipe piece - again, as an embellishment and to secure the glued parts - and the ribbons to tie under the chin if wanted.
That too sounds a lot easier than it was. I tried several variations for the lace and the ribbons until I was happy.
Now I may have to make a little hat pin to make sure the bonnet will always sit well.

All in all it took me about three days to make the bonnet and I don't see myself making another one very soon! ;-)


And now here's Francie in all her beaded glory.
It was a fun project, a frustrating project at times, it took patience, fantasy and, I'll be honest, some cursing, too.
There were moments when I thought I wouldn't be able to finish it, but now I'm very happy that I pulled it through!


Francie is a registered trademark of Mattel, Inc. I am not affiliated with Mattel in any way.

5/28/2021

Miss Francie Bennet - Part 1, The doll and the dress

Some projects take a little longer than others. In this case, little means more than five years. That's how long Francie had to wait for her beaded outfit.
I think it was worth the wait. My first try at looming her a particular style of outfit went completely wrong, but now I knew how to use different techniques to give her her (or rather my ;-)) dream outfit.

Let's talk about Francie first, however, because this one is special.
"Colored Francie" (#1100) came in two issues in 1967 and 1968. She had a twist waist, bendable knees, and rooted eyelashes. The difference between the two issues were the hair and eyes. The first one had red hair and reddish-brown eyes, the second one had dark brown hair and eyes and a darker skin tone.
There was just one problem. "Black Francie" as she is known among collectors may have had the skin, but she didn't have the features of a true African American doll because the mold of the Caucasian doll had been used. The doll didn't sell well and so wasn't produced in large numbers. Probably African American children just couldn't identify with her which is understandable. It's why Christie is often regarded as the first real African American doll.
That makes her one of the most sought after Francie dolls (after the Japanese specials).

My girl (Francie is supposed to be a teenager) is the first issue. She has a few problems - so do I and after all she's just two years younger than me! She has some nicks on her foot, some light scratches here and there, and not only has she lost some of her hair over the years, but some of it looks like it has become burnt and has shriveled up and some of it is kind of orangey.


I was not brave enough to risk the hair she does have, so she didn't get a new hairstyle. I didn't touch her bangs and for the ponytail didn't dare playing with beads, but used just a bit of string because even light combing cost her more hair. Re-rooting was not an option, though, I would only have done that if she had been mostly bald, also I had planned a hat for her.
It's not as if the outfit is historically correct 100 %, anyway. There are things that are hard to recreate in beads, but I have done my best.

Now why do I call her Francie Bennet?
I'm a fan of Georgette Heyer's books, especially the ones set in the Regency period (1811 - 1820), and I love Jane Austen's "Pride and Prejudice". From the start I wanted this special doll to wear something special although I knew it would be a bit of a challenge. Her name is of course inspired by Miss Elizabeth Bennet, the protagonist of "Pride and Prejudice".

Today I'll show you her dress.
My original choice of color had been pink and grey. Although I'm not necessarily a big fan of pink, pink and grey has been a favorite color combination of mine ever since I had to crochet my very first chain stitch string bag in elementary school.
Like I said, I had already tried a loomed version with Delicas, but although I had measured more than once, it just didn't work out. I took the parts of the loom and left them in a drawer to die. Yes, I was mad. Eventually I gave myself a good kick, cut the parts up and used the beads in both my Flapper Dawn's and 80s Barbie's outfits.
For the next attempt, I chose seed beads instead of Delicas because they look nicer in Herringbone. Don't look for the grey beads, in the end I decided the contrast was too much and I'd rather play with colors in the accessories (as a matter of fact, however, the grey beads are hidden under the dress in some kind of underpants, shhh).


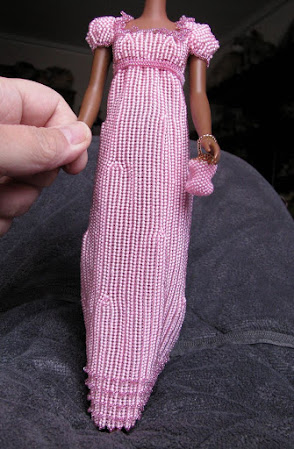
Miss Bennet's dress is made from pink lined crystal beads. I love them, in the light the crystal parts sparkle so beautifully! Unfortunately I didn't quite manage to catch that in pictures.
For a very subtle contrast I chose sparkly rose colored 15/0 seed beads for the ruffles around the neckline, the lace at the bottom of the dress and the ribbon that is sitting right under the bust and ends in a bow at the back which is hidden by the shawl, though, which you will see tomorrow.
I couldn't believe how long it took me to make the dress, but Mattel dolls do have long legs and here it seemed even longer because of the high waistline!


A real problem were the shoes.
Had Francie stayed inside, she would have worn shoes with a very pointy tip, a side seam, a rounded kitten heel ... all things that I couldn't recreate in beads or things that wouldn't stay on Francie's feet, and of course there were still her foot problems.
So I settled for some boots instead, in honor of the scene in the famous 1995 mini series "Pride and Prejudice" in which Lizzy Bennet is walking across the fields through the mud to visit her sick sister in Netherfield Park.
I was even a little tempted to add brown beads for mud to the seam of Francie's dress *lol*
Of course these boots are by no means perfect, but they were the best I could do, and believe me, I tried. I think I made at least six shoe versions once again and there was
massive cursing. I tried 15/0 beads to make the "leather" look thinner, I tried slippers that went high up to hide the feet, to no avail.
If Francie wants to wear brown basketball boots, so be it. I wear comfy shoes myself. Maybe I'll have an amazing idea one day, but actually you can hardly see them under the dress, anyway. For this picture I pulled the dress up.


Okay then, that's it for today.
Tomorrow I'd like to show you the accessories I made - besides the pompadour that already sneaked in with the second picture.
I hope to see you then!


Francie is a registered trademark of Mattel, Inc. I am not affiliated with Mattel in any way.

5/27/2021

Oldies but Goodies - Play with me

A new week, a new Jewelry Artisans Community Oldies but Goodies Challenge.
Do you play with your jewelry? Twist a necklace, play with a fringe or dangles, touch the stones, shake the head to let your earrings fly, play with a spinner ring or just spin a ring around your finger ...
If you answered this question with a no, I suggest you try it, it's fun. Sometimes it may help you to calm down if you are nervous or you just satisfy the playchild in you.
I have a necklace that is so long that I can do a lot with it, especially in meetings, and sometimes I wonder if it makes others nervous to watch me. Maybe we should hand out "play jewelry" for everyone before meetings?

From the many entries I chose five today. Which one would you choose for a meeting? ;-)


1 My Bijou Life
2 Jewelry Art by Dawn
3 RioRita
4 Cymberrain
5 Cat's Wire

5/20/2021

Oldies but Goodies - Beads

What is a bead? Wikipedia says that a bead is a small, decorative object that is formed in a variety of shapes and sizes of a material such as stone, bone, shell, glass, plastic, wood or pearl and with a small hole for threading or stringing.
Beads can also be addictive. So many shapes, so many colors, so many ways to use them!

Just a few of these ways are represented by today's collage of items from the last Jewelry Artisans Community Oldies but Goodies Challenge.
We have hand painted beads, big and small ones, handmade beads from silver, different colors, glass, wood, stone ... and still this is just a very small glimpse into the world of beads!


1 and 10 Cat's Wire
2 and 3 My Bijou Life
4 and 7 RioRita
5 and 6 Jewelry Art by Dawn
8 and 9 Silver Jewellery Girl

5/16/2021

The beach is calling

Our bi-monthly challenge mistress at the Jewelry Artisans Community has been messing with our minds. The challenge is bi-monthly, by the way, not the mistress. See how my mind is already messed up?? ;-)
Let me try this again. Every two months we have a theme challenge at JAC and the good lady chose matching earrings. Great. We all know that matching earrings can be very hit and miss for me. Nevertheless I made some, only to find that she had changed the theme to beach to make it easier for us busy people. Serves me right for skipping that one post.

Beach, beach, beach, there was the beach in Wales we never found despite the signs (I still think they were fake and just meant to lure me into a field full of cows). The only beach I really remember was the one near Bodega Bay. Such a long time ago that I was there the last time, more than 20 years!
Seagulls, weird stuff on the sand - probably algae and remains of jellyfish - sand dollars, other birds and shells ... I knew it would be shells.
Shells are so easy to use in jewelry and I had a bunch of bigger ones that I had been gifted by a co-worker. I have netted shells and crocheted around them with wire, I made them from polymer clay, but you may have noticed, I'm having a lot of fun with bead embroidery lately. Sorry if it gets boring, guys.

The hardest part was to choose one of the shells, and once I had glued it onto the backing, the next hardest part was to decide what to do with it now. Actually I thought it was pretty without adding too much to it, and as luck had it, I happened to have the perfect beads to make a bezel in the colors of the shell itself. For a moment I was tempted to just leave it like that, but then added one single row of bronze metallic beads for contrast.
Now it needed a few pearls. I know, I know, that's not original at all, but shells just scream for pearls.
My first idea was to add one row, but then my dangle addiction raised its omnipresent head and I couldn't stop myself from making a little fringe in the center.

The last decision to make was the chain. I thought about a bail, hidden or not, two bails, chain, cord, everything I didn't have, so I ordered beads for a simple beaded rope.
Voilà, here we go!
Do you think it will please the challenge mistress?

5/15/2021

Here's looking at you, kid ...

Last year I used this collage in one of my nostalgia posts about a Steiff King Charles dog, a tin full of vintage glass eyes for plush animals, and a shoe company.
These are just a few of the eyes in that tin, and since my collection has pretty much reached its limits, I doubt that many new eye patients will turn up who need them.

A few days ago I had an idea what I could do with at least some of them.
As you can tell from the picture, the eyes don't all look the same. Most of them are not flat in the back, but have a little (or not so little in case of the pink/red eyes on the bottom right) bump for the wire. I also think it might help the eyes better to sit in the plush animal's eye sockets.
I can only use the flat ones and I have been wondering if there is a way to make the others flat, but for now I chose a pair of old brown eyes of which I have several. After all I don't want to use eyes for jewelry and then need them for a patient eventually.

Some of the eyes are made from colored glass, but the really old ones, like the ones I have used, have a black glass pupil in clear glass and are painted on the back to give the eye its color. Many of these vintage ones have lost some paint which is a pity. Of course you can repaint them yourself, but I'd rather use a damaged one because to me they have a special charm.
They have to be flat if you want to use them in bead embroidery.
In this case, I glued them onto the backing very carefully because of the paint and then let my muse guide me - from the bezels that give the iris some extra shine to the white of the eyes for which I used three sizes of beads all around the iris to give it that wide eyed look, the black around the yes and the "lashes" of silver coated dagger beads only at the bottom edge.
It makes me wonder what they see!

5/13/2021

Oldies but Goodies - Fresh

I thought I didn't hear right when I was told last week that 30° C (86° F) had been predicted for Sunday.
Guess the choice for the new Jewelry Artisans Community Oldies but Goodies Challenge topic hadn't been too bad - it was "fresh" as if it was meant fight off the heat lurking outside, just waiting to get me ;-)

Fresh has so many more meanings beside cool, though, that this wasn't a very difficult challenge. It can mean anything from new, pleasant, not salty, not artificial, relaxed, and more depending on the context.
The easiest thing to do was to show fresh colors, but in one entry the word has a different meaning ... cheeky. Can you guess which one that is? :-D


1 My Bijou Life
2 Cymberrain
3 RioRita
4 Jewelry Art by Dawn
5 Cat's Wire

5/06/2021

Oldies but Goodies - Shapes

This post for the last Jewelry Artisans Community Oldies but Goodies Challenge is dedicated to my math teacher in 7th grade. You tried, Mr. Haasl, you really did, but no matter how much it is said that girls can do math just as well as boys, I just wasn't one of them. It wasn't just math, I also struggled with chemistry and physics - and to be honest, I wasn't interested in exploring science's depths myself - but I think geometry probably caused my only true breakdown in school. You comforted me, you encouraged me, and I'm sorry that it didn't work because you were really one of the good ones, and a nice person and neighbor as well until you passed away much too early.

You, my dear readers, don't have to explain anything or calculate or prove now, though, you can just sit back and look at the shapes we are bringing you with today's challenge. Aren't I a nice person, too? :-D


1 Jewelry Art by Dawn
2 My Bijou Life
3 Cat's Wire
4 RioRita
5 Silver Jewellery Girl