Be gentle with me. I haven't done any kind of tutorial before, and I thought I'd try it with something small first. What I learned from this is that I need more hands (or a helper who can deal with my moods ;-)), better weather - I made this in my light tent and had a bit of a space problem - less distraction and maybe more patience. I hate to put something down to take a picture, that's something I seriously need to work on.
What you need to make this cute little flower:
Round nose pliers
Cutter
Copper wire 28 gauge of any color you like
7 beads - it doesn't really matter what kind or size you use, they can even all be the same. I like to use one large bead and 6 smaller ones, in this case it's riverstone and jasper. Not even the shape of the center bead matters much once you have some practice, it can be oval for example. If your center bead is very large, you might need more of the beads for the petals to avoid big gaps
A crochet hook - again you can use different sizes as long as the hook is not too big. My favorite one is a 1.65 mm at the moment, but I have used anything from 1.3 to 2.1 mm.
Which stitches you should know:
Slip knot, chain and single (double if you are in the UK) crochet stitch
1. First of all you need to put the beads on the wire, first the small ones, then the large one because this is the one you'll start working with.
2. Make a slip knot and tighten this knot around your crochet hook by tugging on both ends of the wire. Don't make it too tight as you'll pull one of the loops open again.
Leave a tail of wire long enough to go back and forth through your center bead a few times later on.
3. You can see that one loop is tightened, that's the little knot on the bottom. The second loop is big enough to go the whole length of the bead, it will be the foundation on which we put the "petals". Add a chain stitch as small as possible. If you don't add this, you won't be able to crochet the petal beads onto the loop, but you also don't want it to stand out too much.
4. The next step is to add the smaller beads with single crochet stitches. Slide your bead next to your last stitch, pull some wire through the loop wire. Then grab the working wire with your hook and pull it through both loops. Try to keep your wire tight on the same spot of your crochet hook to achieve regular stitches.
5. Once you got three stitches with beads on one side of the loop, turn it around and add three more on the other side. Cut your working wire, pull it all the way through the last stitch and tighten it.
6. As you can see, this flower is not looking very symmetrical yet, the bead holes look in different directions, and the petals look kind of loose. You can bend it in shape, you can add single crochet stitches to make them sit on a base or you can deal with that later ... as we will.
7. Cut your wire and leave a tail long enough to go one or two rounds through all of the petal beads.
8. Pull one of the tails through your center bead.
9. Anchor the wire in one of the stitches on the other side and go back through the center bead. You can repeat this as often as the size of the bead hole and the length of the wire allow.
10. After going through the center for the last time, anchor your wire, wrap it around the stitch once or twice, cut it and hide the end in your stitchwork.
11. If you now want to fix the symmetry issue, all you have to do is use your second wire. Just go through all the outer beads and gently pull the wire tight. Again, you can do that once or twice.
12. You see that the center bead sits slightly on top of the others now.
13. Wrap your wire around once or twice and cut.
14. Voilà!
You can do different things with these flowers. Turn them into little pins by adding a needle, put a bail on to make a pendant or add some chain and a lobster clasp to create a sweet little zipper pull. Use earwires to make them into earrings.
Use up leftover beads, go wild with colors and shapes, and most of all - have fun!
Again, if I left something important out, let me know and ask. I'll learn to make it better over time, I hope ;-)
Mother's Day is on the 12th of May this year (in the USA and Germany), so we at the Jewelry Artisans Community decided to make it the topic of today's JAC blog carnival post.
Maybe some of you remember that last year I told you that my Mom is not keen on Mother's Day. Surprise ... it's still true.
It made me wonder what my friends did for Mother's Day when we were kids, but I can actually remember just one. We always went to the bakery together and picked out a cake for her Mom - that we ate most of in the end if I remember that right. We also picked flowers together, the house was close to the meadows on the edge of the woods, so it was easy to carry loads of them home. And I'm almost sure we drew some pictures.
Maybe I should surprise my Mom this year by not doing nothing on Mother's Day, but instead going all traditional and old-fashioned. I could draw her a picture (or bead one?), get her some flowers and if not cake then something else she likes to eat. Or of course finish that pendant that still on my desk *hanging my head in shame*
What do you have up your sleeve for Mother's Day?
If you want to know what the other JAC people have up theirs, check out their posts. Links will be added as I get them, so be sure to come back and take a look.
Ponder the Cat
Bead Sophisticate
Jewelry Art by Dawn
Jeanne's Jems and Jewels
Real life has me being a bit tense these days ... some days more than others.
And sometimes the only way to make the world around me go away for a while is to experiment. To play with materials without the goal of making some beautiful, useful or planned. If I'm lucky, it will turn into something that I learn from or it will develop into something I like after all, something beautiful, or it becomes something the world doesn't need, but something my inner playchild needed.
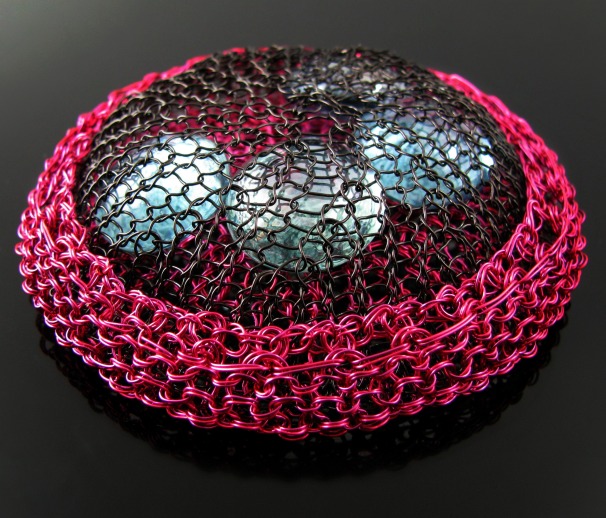
This ... erm ... thing is just one of these pieces. I could use it as a paperweight maybe or I could keep shaking it to make the glass gems inside rattle.
Curious already?
Let's start from the beginning, shall we?
I have a bunch of hot pink wires in slightly different hues. Now hot pink is not a color I use very much, so it's usually a good choice for an experiment.
And for some strange reason I have two enormous spools of black wire. Don't ask me, I have no idea if I intended to crochet a black gothic cloak or a humongous black cat (now that's funny because that is one animal that absolutely refuses to be made by me, believe me, I tried) or if I had just forgotten that I had already ordered one before. So black isn't a bad choice, either.
The black thing on the left is what I had made a while ago, for no particular reason, not a reason I can remember at least. It's like a little wire knit bowl, and I had no intention whatsoever to use it for this piece.
I took two pink wire spools, if you look closely you see they are two different colors, and knitted a ... thingy until I suddenly noticed that the pink one was about the same size as the black one now. I kept knitting and added a rim to the pink "bowl", so I could fit the black one in there.
No, this is not a UFO. Although a pink UFO would be fun.
And of course the natural choice was to put something in there then. Ponder the Great Nagger was too big, so I used the glass gems instead. Although the black part can be pulled out and put back, it won't come out by itself.
If you think that was it, you are wrong. What I like about the wire knit structure is that you can bend it, fold it, unfold it, and if you are being careful about it, it won't kink and break right away. Stretching is not always that good an idea, but I didn't need to stretch anything here. I pushed the bottom of the pink part in, I pulled it back out, I flattened the rim, I pushed the black part in, I put "pleats" in .. in other words, I had fun.
What am I going to do with now?
I really don't know, but I already used the idea in this flower pendant and am contemplating variations. I know it's a little more difficult to see here because the crystal in the center and the petals hide details.
I promise that if I make another one, I'll take pictures of each detail during the process, so you'll be able to live in my head, just for one blog post. Longer than that could be dangerous! ;-)