Showing posts with label beaded shoes. Show all posts

2/13/2023

Autumn Dawn

A small tin with old bead soup in autumn colors called to me this weekend. When the beads call, you have to listen and I did.
I happened to have a doll in my beading box - because who doesn't - and could start right away, then one thing led to the other.
Let me introduce Autumn Dawn. I think it's quite obvious how she got her name wearing those colors although it's probably more like late summer, walking around sleeveless, in crop top and sandals like she does!


Actually, the name is a little misleading. Just the head is from a Topper Dawn, the body is from a Dawn clone marked "Hongkong B & G" about which I couldn't find out anything. The doll came to me like that, I don't know what fate brought those two parts together.

I think I have mentioned before that I often start with the bottom part of an outfit, in this case with the skirt that I made from the bead soup. As the beads not only had different colors and finishes, but also differed in size, I opted for a colorful  tiered skirt with wide folds to hide the irregularities a bit.


Next were the sandals. As the bead soup had not been enough for a floor length skirt, they were much easier to do than the shoes usually are when I have once again forgotten to bead them first and don't have much space for working.
Autumn Dawn's one foot is a little straighter than the other one, so to make sure the sandals would stay on, I beaded the wide straps at the ankles (my first odd count peyote, by the way).


The top is a new design. Usually I start working from the waist, either directly on the doll working my way up, or I make a front and a back part working from the bottom up and then join the seams at the sides.
This time, however, I made the peyote back part sideways and then extended it on both sides, finally joining them in the front which resulted in a crop top. Two straps on both sides made it sit really well.
To give it a little extra, I added the bronze drop beads at the front and sides.


Dawn likes accessories, but a necklace would have been too much, so she only got two little bracelets from different beads.


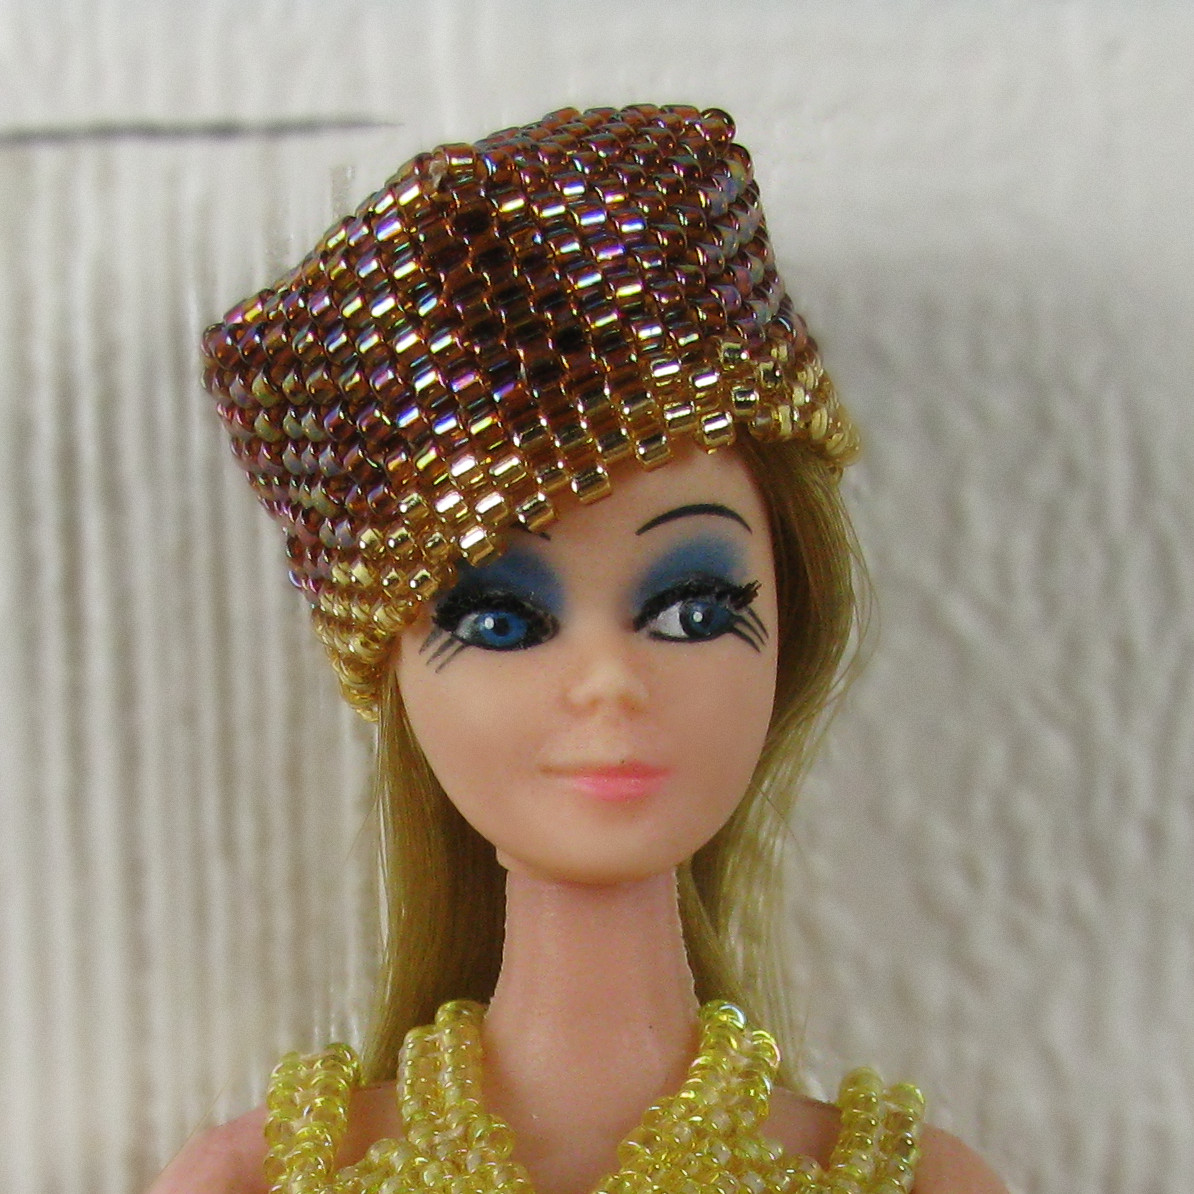
The hat. I can't resist a hat and my excuse is that Dawn's hair refuses to stay in place. This hat from gold lined and amber AB beads was mostly inspired by the amber beads' limited number, but also by one of my favorite Murphy Brown episodes. I was so tempted to add a tassel, follow the link and you'll know what I mean.

Last but not least, the purse. For someone who only carries around her beloved shopper, I am definitely obsessed with beading purses, totes, etc. for my dolls.
I chose the color to resemble linen, with matte "leather" for the strap, and embellished the purse with small golden spacer "flowers".


There you go - Autumn Dawn :-)

Dawn was a registered trademark of the Topper Company. I am not affiliated with Topper in any way.

2/05/2021

The Fairy Queen

Do you remember Dawn, my little Topper doll? After having her lying around without clothes for years because 1. I didn't even know back then what or who she was, 2. I had no idea where to get clothes for her, I had finally made a fancy little dress and accessories for her out of seed beads.
As Dawn is only 6 1/2 inch - compared to the 11 1/2 inch of a Barbie and 11 1/4 inch of a Francie - it may not be instant gratification to make something for her, but it's definitely quicker. I couldn't help myself and had to get more Topper dolls, two more, to be exact.
After making the dragonfly pin, I knew what I wanted to do with one of them.
Dawn was to become a fairy!
Only she's not really Dawn, but one of her friends as the head mark 11C as opposed to 11A told me. She's Jessica who used to be a stewardess (yes, that's what it was called back then). It's kind of funny because last time I had thought that Dawn was a Jessica, and now I fell for it the other way round. I should have noticed that her hair was not as full, but I'm so used to different Bubble Cut hairstyles on vintage Barbies that I simply didn't think about it.

As usually, I made the dress first.
What do you think of when thinking of a fairy? Tinkerbelle? Flora, Fauna and Merry-weather from Sleeping Beauty? Cinderella's fairy godmother? Oh, no Disney fairy at all? Maybe one from a fairy tale book you read as a child? From a fantasy movie?
Do you imagine a long dress, a colorful hat that reminds of a witch's hat? Something short and green? A cloak with a big bow? Something glittery? Something colorful like flowers? That's the fun part about it, your imagination is the limit.
My imagination sent me to a combination of reds and browns with some gold mixed in. I made the dress using the Herringbone technique which has proven to be the most versatile so far, at least for me who's not that much of an off loom beader (yet?). I like the "pleats" in the skirt and hope to be able to reproduce this in a bigger dress eventually.
This time I forgot to take a picture of Jessica just with the dress on, but I'll get to the accessories again later.


Next were the wings. It's two sets of wings which I made in the bead embroidery technique with golden seed and bugle beads. Instead of enhancing the golden look as I did in the dragonfly wings, I used tiny clear AB seed beads with the sequins here.
Sewing the wings on was quite a fiddly thing to do, especially with the arms constantly getting in the way. The hard part was also to sew them on in a way that wouldn't make them move too much, after all I don't want them to fold up in the back, so you won't be able to see them.
I would say this part challenged my patience the most, and yes, there was swearing!
Here's a close-up of the wings.


My first thought had been to give my fairy a wand, but the typical wand with the little star on top seemed a little stereotypical. Instead, I decided on giving her a long staff, something sturdy, something to emphasize her power as a queen even more than the little golden crown of seed beads and coated hematite.
After thinking for a while, I remembered having wood skewers left over from my polymer clay days. I used size 15 seed beads to cover one of them in peyote, going from coated clear beads at the bottom to golden ones at the top.
The Swarovski crystal came in very handy although the story goes that it's really a citrine found by the dwarves and gifted to the Queen of the Fairies ;-) I could have used the same one in a smaller size, but the Queen made very clear that she didn't think small.
For the connection between staff and crystal I glued on a thick layer of golden seed beads to strengthen the thread connection. It was one of the rare times when glue and I made up a good team!
The staff is attached to the hand by means of a little bracelet and I can even move it into different directions without it falling off.


Last but not least came the everlasting struggle with the shoes. As I had already mentioned in my post about Dawn, the Topper dolls have tiny feet thanks to their size. Once again I tried slippers like I made them for Francie before, I tried to make the soles in different sizes and use differently sized beads, but to no avail. Even when I admitted defeat and got back to the sandal design, I still had to experiment with that.
This is attempt #6, I think, the one that finally made me happy. They stay on her feet and they fit the outfit. I didn't have a golden thread, but I have a gold metallic pen coming to cover it and even like this the "golden yellow" was still the best choice.


Thank you if you have made it to here. I'll end this post with a picture that is giving you a better idea of the Queen's size. This is an ordinary step on my stairs, so you see that our fairy is indeed one of the "small folk".
Don't let it deceive you, though, I'm sure she knows how to use that staff, for magic or to hit you with it! ;-)


Dawn was a registered trademark of the Topper Company. I am also not affiliated with Topper in any way.

1/06/2021

The HeatherCat shoes - Part 4, Summer Dreaming

For those who missed the first three parts - which you can find here, here, and here - and those who don't know the HeatherCats yet, here's a little explanation.
"Heather is a friend of mine, a painter from New Zealand. I met her on deviantART and got to know the Essencestudios. I couldn't even tell you in what group it was, but among her talents Heather has a talent for bright, whimsical paintings, many of which are cats, so how could I not be fascinated the moment I saw the first one?" This is from the first blog post I wrote about the HeatherCats and in which you will find the whole story how it started.

I hadn't expected to finish the last part of the shoes so quickly. With the holidays and vacation days, however, and nothing else to do (that I wanted to do, at least ;-)), I concentrated on binge watching - or hearing, rather - crime shows and beading.
Oh, and some crafty documentaries which show in detail how someone is making something, a hat, a wooden inlay chessboard, a barrel or a church window, for example.
It may sound silly, but if my brain refuses to shut off, it helps me to pretend that I'm in one of those documentaries and someone else is watching me. It makes me concentrate on each stitch, each bead even more, the sounds of the thread going through the denim, the snipping sound of the scissors. It doesn't always work, but if it does, it's perfect.
It helps me to calm down and shut the outside world and its problems out for at least a while which is something I really need at the moment.

Back to the shoe, though.
For this side I had chosen another sleeping cat. Now I have three sleeping cats under blue sky and only one caterpillar, but they were so perfect in size and they all have their own charm. Maybe I'll have to get high top sneakers next time, so I can use Heather's vertical designs as well.
"Summer dreaming" is a white cat sleeping on a fence. The position reminds me a lot of the way my Merlin and Greebo liked to sleep which makes me smile every time. I can also imagine that this is my White Dude sleeping under a California sun before those crazy people dragged him off to Germany (if you don't know the story, it was for his best, really).


Just like the caterpillar, this little fellow was not easy to fit onto the shoe. I think I tried the pattern three times before I finally found the right size and position to get his tail on there and still not lose one of his legs to a hole. The sun wasn't as lucky, it had to squeeze into the corner.

If you wonder, by the way, what happened to the rest for my hands, well, I found that I happened to have one tube of the color that is still on backorder after all, so I couldn't stop myself. It went surprisingly well most of the time.
I mislaid the some of the blue for the sky instead, but I ordered so much that that didn't matter. Someone also ordered much too much brown, no idea how long I thought that fence would be. Maybe watching Tom Sawyer's famous fence painting scene had confused me.
So I guess I'll have to think of a design in brown, blue and white now. Any ideas? ;-)

And here's our cat now. I bet he's dreaming of chasing mice and his favorite treats!
I even managed to clean off the blood that had been shed. My friends told me to see it as blood sacrifice to the bead goddess. She has to be really happy because I sacrificed more than once, not to mention all the needles that gave their lives for this project.


This is what the shoes look like worn. I have been asked if I am going to wear them outside, and I keep joking that I don't even know when the chance will come up again with Covid around. Let's say that I won't wear them on a regular basis to avoid dirt and damage, but I will definitely show them off eventually.

Sorry that I couldn't take better pictures, but it's hard enough to get my big feet into a picture - they are a EU 43 which translates to a US 11 1/2 and a UK 9 ;-)


Now what will be next?

12/25/2020

The HeatherCat shoes - Part 3, The CATerpillar

For those who missed the first two parts - which you can find here and here - and those who don't know the HeatherCats yet, here's a little explanation.
"Heather is a friend of mine, a painter from New Zealand. I met her on deviantART and got to know the Essencestudios. I couldn't even tell you in what group it was, but among her talents Heather has a talent for bright, whimsical paintings, many of which are cats, so how could I not be fascinated the moment I saw the first one?" This is from the first blog post I wrote about the HeatherCats and in which you will find the whole story how it started.

As you know if you follow this blog, I had taken a break after the first shoe was finished. I often have to do that after a big project to regather motivation and to give my hands some rest, so I did my bauble project instead. I also sneaked in the wire fairy mouse which was nice as this year has been very much about beads and a bead embroidered snowman ornament for a gift.
On the 11th I officially announced the start on the first side of the second shoe, though, and I finished it last night around 2 am. Two weeks, that's not too bad. Now, however, my hands definitely need a bit of rest, my left wrist is hurting, and I decided I really have to look for a thimble for my right hand. The last small section of the shoe tested my patience and my fingers big time!

For the motif I had chosen one of my absolute favorites of Heather's cats. The original gouache is on my wall looking down on me. It's the CATerpillar. I have never asked Heather where she got the idea for this one, I'll just imagine New Zealand has brightly colored caterpillars with little cat heads ;-)

One of the difficulties was to fit him onto the shoe without the holes cutting into him. I'm actually quite proud of myself for fitting the head and antennae so neatly between those holes.
I'll let the picture speak for itself and hope you are going to stay around for side #4. The pattern is chosen, but not transferred to the shoe yet, also one important bead color is on backorder, so my hands will get their little break ... if I can't think of anything else to do, that is ...

10/28/2020

The HeatherCat shoes - Part 2, Biskit's Bum (ft. Hannah Needle)

For those who missed the first part - which you can find here - and those who don't know the HeatherCats yet, here's a little explanation.
"Heather is a friend of mine, a painter from New Zealand. I met her on deviantART and got to know the Essencestudios. I couldn't even tell you in what group it was, but among her talents Heather has a talent for bright, whimsical paintings, many of which are cats, so how could I not be fascinated the moment I saw the first one?" This is from the first blog post I wrote about the HeatherCats and in which you will find the whole story how it started.

For the second side of the first shoe I chose another favorite of mine among her paintings, Biskit's Bum.
Here's the original painting.


What makes this one even more special is that Biskit was Heather's own cat who lived to be over 20 years old ❤️ ...


If you compare this to the Lazy Cat, you see that there's less detail, therefore I thought it would be quicker to do, but maybe that and the fact that I broke even more needles than the last time wasn't that good for motivation. I'm not a master at repetitive patterns.

I didn't give up, however, so one shoe is finished now, yay!
It was too dark already, I had to take the picture with flash which obviously changes the colors a bit. If I can get a better picture tomorrow, I'll add it to the post.


Last but not least let me introduce you to Hannah Needle, my employee of the month. She was at my side through the hardest part of the shoe, literally speaking, towards the heel. She had to give up four beads before the shoe was done. Her sacrifice will not be forgotten.

10/17/2020

The HeatherCat shoes - Part 1, zzzzzz... or Lazy Cat

After my last shoe adventure  I had vowed not to work on something big that fast again. How silly of me. I thought of the HeatherCats and knew there would not just be another pair of sneakers in my "near" future. I wanted to go a step further. With the last shoes I didn't have to think about a pattern. With vertical seams in the fabric and bugles for beads there wasn't much room for a pattern. But the HeatherCats ....

For those who don't know the HeatherCats yet, here's a little explanation.

"Heather is a friend of mine, a painter from New Zealand. I met her on deviantART and got to know the Essencestudios. I couldn't even tell you in what group it was, but among her talents Heather has a talent for bright, whimsical paintings, many of which are cats, so how could I not be fascinated the moment I saw the first one?" This is from the first blog post I wrote about the HeatherCats and in which you will find the whole story how it started. As a matter of fact the cat in the first bracelet I ever made after her paintings was also the first cat that I chose as my first shoe pattern.

This project really needs a lot of patience which I'm not necessarily blessed with. I beaded this two beads at a time, and there are a lot of beads in this.
So, instead of writing one big blog post sometime in spring I decided to write one for each side of both shoes as there will be four different patterns, anyway.
Here's the first one.

Heather called her gouache painting "zzzzzz..." which is very accurate. I don't know if the other name came from me, but in my head it was always "Lazy Cat".
Lazy Cat is sleeping on a wall in a garden under blue skies. It's very peaceful and you can almost hear birds singing and bees buzzing even if you can't see them.
This is the original painting.


It's not always easy to transfer Heather's distinctive style into beads, but she graciously allowed me to make changes where needed. That is one thing in the loomed HeatherCat pieces and another in a bead embroidery piece as I was to find out. She likes to use points and swirls as in the plants, and often there are details with fine, differently colored borders. That's where I had to let my fantasy play.

The second challenge was to fit the details on the shoe which obviously isn't rectangular. So I had to lose the tree for example and the flowers couldn't be quite as high. I also had to deal with some seams even if there weren't any vertical ones.
Last but least there was the part next to the heel which is thicker as the rest of the shoe, just like the part where the tongue meets the denim towards the tip.
Doing just that little white part to the left of the big plant took me forever because  I had to work blind again and find the right spot to poke through the layers - with the help of pliers, of course - and I don't even want to talk about the part on the right where I settled for a few stray beads.
I won't show you the pictures of the inside, but if you ever need my DNA, you can try to get it from the blood stains ;-) I also did my best to help out the needle industry. My record was five brandnew needles in one hour.


I honestly can't believe I even made it that far. I already started the second side when I was waiting for a bead order, so hopefully it won't take too long until you get to see more.

8/16/2020

Beaded sneakers

I wasn't sure if I would ever get them finished. The beaded sneakers are definitely one of the, if not THE most time consuming project I have ever worked on.
It's rather funny that it actually started out as something I made to use my stash of bugles and ended up in a kind of an obsession.


The beads are stitched on in backstitch, always a combination of one bugle and one seed bead at a time, so that may give you an idea of how much time went into these shoes.
When I started working on them, I had grabbed my only pair of jeans sneakers. I had the idea and I wanted to try it right away and not have to wait for a shoe order.
What I had not taken into account, however, was that those shoes were not meant to have laces. They have elastic bands on both sides of the tongue which means you can't pull that out, and you can't open up the sides.
Now that meant I had to work blindly from the inside on most parts of the shoes and feel around with my hand inside of them to find the right spots for my needle, and more than once the needle thought my finger was just right. A lot of times I had to try several times before the needle finally ended up in the right spot.
So if you want to try this, be smart and don't use this kind of shoes!

Another problem was finding that the blue bead mix wouldn't suffice for both shoes and I wanted to use my stash, not order more beads. So I mixed up a batch of transparent warm colored bugles instead and went for a "Night and Light" design. Even if that had not been the plan, I liked the effect.


Those were not the only problems, though. Like many sneakers these ones also had reinforced heels which was one reason for leaving them unbeaded. That reinforcement, however, also went around the sides into part of the back segments. I broke quite a few needles on these parts although I used pliers. With pliers and my hand in the shoe it got quite crowded in there, I tell you that! ;-)
Then there were the tongues which tend to crumple up at the top due to the elastic bands, so I couldn't use bugles sideways there, not to forget the big leather logo that I didn't dare taking off or stitching through.
My solution for that was to use the beads lengthwise, but more spaced out than those in the side segments.


The middle segments had little logos in the center for those people who fail to notice the big one (can you tell I'm not a fan?). I had no scruples hiding them and luckily the center part was fabric with rivets only in the corners. Do you notice how the beads seem to cave in at that spot? That's because the border of the logo was a bit higher, but at least the rivets had the perfect space between them, so I could fit my bugles in.
The spaces between the holes for the shoelaces (these are functional) proved similarly difficult because I needed shorter bugles there, but most of them were one size and too large. I had to cut off a few and filed them down to protect my thread. That sounds a lot easier than it actually was because it's not easy to hold such a small bead and file at the same time.


I kept the "curved" segments with the two holes towards the tip of the shoes for last. These holes are non-functional, there's an extra layer of fabric sewn on underneath. I tried, but thicker fabric and even less space because of the shoe curving towards towards the sole won over my determination, so I just "sprinkled" a few seed beads on which connects it with the "sprinkles" on the tongues.A friend suggested to try out some satin shoe laces for the extra kick. I'll let you know how that works out!