Showing posts with label sequins. Show all posts

12/24/2023

Christ Child Dawn - The twenty-fourth door


Happy Christmas Eve!


In last year's advent calendar I told you about the tradition of the Christkind (Christ Child) who is the gift bringer in my area of Germany - an angelic figure with wings and golden locks, sometimes with a halo, sometimes with a crown.
The idea to turn a Topper Dawn into an angel eventually, obsessed with making wings as I am, just had to come to mind when I first thought about projects for this year's calendar, but not before I finally started working on her in November, it came to me that she wouldn't just be an angel, she would be the Christ Child on Christmas Eve which of course is the gift bringing day here in Germany.


P.S. I know that I usually talk a little about how I made an outfit, but it's Christmas and it doesn't seem the time for detailed descriptions.
If you have questions, let me know in the comments!


Dawn was a registered trademark of the Topper Company. I am not affiliated with Topper in any way.

12/04/2023

Pokey bauble - The fourth door


I told you this would be a crafty advent calendar and that means there will not just be beads which sounds a lot easier than it is for me.
To be honest, I have never been the crafty type.
Whenever I think of crafting, the first image that comes to my mind is me sitting at the parish hall, around nine years old, glueing wooden clothespin halves together to make a coaster, and hating every second of it. If I'm not completely wrong, it was the only time I was at that crafting circle.

When browsing through YouTube tutorials for the advent calendar, however, I was glad to see a few that seemed right for my limited skills. Among them were sequined ornaments.
I didn't use a particular tutorial because the basics are actually rather easy. You take a styrofoam ball and pin your sequins on, in whatever way you like, striped, in swirls, combined with glitter or other embellishments ... or you can do it like me.

Doing it like me means that you take a small ball and pin on sequins in waves. Then when you are finished - you have to finish it or you won't bite your table later which is essential for the end result - you decide that you do not like that at all and take all the pins out again. Which takes a little time, but isn't that difficult because you have chosen not to use any glue with the pins (which you don't necessarily have to do, but suddenly it seems safer to you).

So you start all over again, but because you are an idiot, you use a bigger bauble this time, make a few stripes between the "poles" and then despair because the still empty surface seems endless. Because you have small sequins which will take you weeks to put on. Which you could have known beforehand. Doh.
At that point you may get a little dramatic and then think about ordering huge sequins. But wait! You have stars, tiny, small, and bigger ones. That will go much faster, won't it? It might have if you had taken into account that those stars have no holes which means you have to poke some into all of them first. With the tip of your scissors because you couldn't find your pokey tool, and because you only remembered now when writing this post that there is one in your needle felting box ...

This is a tale of poking.
You poke the golden stars that you try to pick out of the baggie while the silver and black ones, especially those tiny buggers, stick to your hands and refuse to come off again easily.
You have to poke the pins through the stars because the holes make it easier, but are still not big enough for the pins.
You dip the pin tips into glue and then poke them into the bauble using the back of your pliers as you still don't own a thimble.

After a while I got into a kind of meditative stupor until I ran out of stars. The forced break while having to wait for more stars to arrive was probably good for my hands and arms.
This ornament has about 5 million pins in it which makes it weigh about 100 kg, but maybe it just feels like that to me ;-) It would bring any Christmas tree down. And it's pokey because of the tips of the stars, hence the title.
It really sparkles like crazy, though. Mission accomplished, but believe me, this one will stay one of a kind.


Oh, and a little extra tip, don't store the bauble in a drawer together with something needle felted or you will picking off fluff forever!

10/06/2023

The cat moth

I live on the first floor and sometimes I get little night guests at the window behind my bed. Mostly they are moths, but I've also had grasshoppers stop by which probably live in the plants on the roof terrace above me.
I can never resist attempting to take photos of my visitors, but it's not easy because of the reflection, because of my small old camera, because I can't use flash although it's night, because this particular window is definitely not the cleanest in the house (I hate having to move the bed), and a cat hoping to claw its way through the glass to get to this fun toy also doesn't help. Ponder went completely nuts for visitors and would keep tapping the glass to which all of them have been surprisingly oblivious, some even stayed for an hour.

The other day this beauty came by, let me take a few pictures and then flew back into the night, as if it had just come by for me to admire it shortly.
Its color was kind of a ghostly white, very pretty, but the light of my reading lamp changed that in the picture. I love that I was able to catch the shimmer in the wings a little.


Shortly after that, Heather (my New Zealand artist friend whose cat paintings I use for the HeatherCats) sent me a picture from an Instagram account. koty_vezde edits animal pictures to give them cat heads or faces, with very surprising results at times. My reply was that I would probably have freaked out if my moth visitor had had a cat head, and Heather wrote that I should make a cat moth.
It didn't take a second for me to know that I indeed would do that.
A while ago, I hadn't been able to resist some fabulous ceramic cat heads with fangs although at the time I had no idea at all what to do with them.
Now, however ...

I went right in.
Bead embroidery, obviously.
I couldn't bead a bezel for the cat head, due to its shape, so I could just as well use the loop for the bail construction.
Sequins for the wings, of course.
A sparkly, "fuzzy" body, just because.

I began by drawing on where I wanted the head to go. It wouldn't be glued on completely as the idea of an edging around the ears didn't appeal to me, and I didn't want the ears to get in the way while embroidering the body.
Next I started the body with some old bugle beads that a friend brought me from an American fleamarket, so I knew nothing about them. She got me different kinds and my first choice was a gunmetal, but my needle didn't even go through most of them twice which was very annoying, so I gave up after a few stitches and turned to the other kind instead. They look black, but if you look at them in the light, they are more like a very dark garnet with a luster which makes them sparkle really beautifully. They are not regular, but I think they worked well here, anyway.

For the wings, I decided on two different colors, black (shiny and matte) because it fits a slightly creepy little cat moth and cognac to pick up on the head's color.
After finishing, I felt that the body was too flat next to them, so I generously added black bicones and black-blue firepolished crystals to it. Major sparkle!

Next the head got glued on, and with all the shine and sparkle, I spontaneously decided that this was not just a cat moth, but a magical fairy cat moth who needed a little headdress (I blame Mabel, my muse, she puts things in my brain).
And while I was already going over the top, I couldn't resist tiny dangles (size 15 beads, by the way, that I had to pick bit by bit off a dustpan after somecat threw the bead tube on the floor and the lid came off by itself).
Last but not least I put on a faux leather backing and did an edging. It was tempting to go completely wild with it, but it would have been too much, so it had to be very understated matte black seed beads.

I'll be showing you several pictures to give you an idea of how much the angle changes the color effect and I also have a not so great video to really show you the sparkle.


3/04/2023

Vampire Bat Angie

I have to admit it to myself, I am not very good with jewelry at the moment. There's a pair of earrings in my drawer that is only waiting for me to decide on earwires. There are also a few small beaded hearts in a baggie waiting to be used in something. I keep picking things up and putting them down again.

Feeling so little motivation right now has a lot to do with what's going on, in the big world and in my small world.
Luckily that doesn't seem to mean that I can't get creative at all. My muse obviously thought that it was about time for me to work on a doll design that - together with two others - has been on my table for months now. This time I actually doodled a sketch of three outfits (during a meeting when I wasn't needed) that had already been in my head even months before that, more to remind me than to follow them in detail.
My doll outfits develop during the process, and not even I can tell what they are going to look like in the end.

For this one, I used an Angie doll for the very first time, a lovely Topper brunette with the head mold P10.
Her hair color doomed her to become the bat lady. You may remember that I have become quite fascinated with bead embroidery wings (ooh, just had an idea for another design), and I definitely saw Angie mostly in black with bat wings. If I still rerooted heads, I might even have been tempted to give her black hair. And call her Angelina for a more romantic vampire name.


The first decision was about the dress being tight or an opulent ball gown style, the flowing nightgown style was out right from the start. One thought that popped into my head, probably because I had been watching old Addams Family episodes on YouTube, had been a dress like that of Morticia, but first, Morticia is not a vampire, and second, I want to make my own designs.
So the dress finally became tight, but there is no plunging neckline, no long sleeves - not only because they are difficult to make with beads as the arms are so close to the body, but because I wanted the contrast of the arms against the wings - and instead of the "tentacles" at the bottom the skirt flares out at a higher point and is a little longer at the back.


To sew crystals to part of the skirt, was a spontaneous decision. Black and siam red is a combo that is irresistible to me. Only when it got dark and I turned the light on, I noticed that I had used both dark and regular siam crystals. It's hard to believe as in these pictures the dark siam seems almost black, but in daylight you have to look very close to tell them apart if you use black thread. Luckily, I liked the effect of different "blood drops" and therefore just added a few more of the light siam crystals instead of ripping everything out.


As usual, I beaded and beaded on the dress until then it was almost too late to make the shoes. Will I ever learn?
Then I realized that I have never thought about vampires' shoes before. Ballerinas, high heels, slippers? I took the easy way out with some simple sandals because they aren't seen underneath the long dress, anyway. They have slim ankle straps, soles and two straps across the toes.


Much more interesting are the wings, at least to me.
I haven't succeeded in getting a good video (yet, I will keep trying) that shows the sparkle of the silver lined red bugle beads against the AB shimmer of the shiny black sequins.
I could have used matte black sequins or shiny ones without the AB finish, but I love the effect of black exploding into color with a small movement.


You know I love making accessories, but they wouldn't have worked in this case.
Angelina just got a small choker with a "vampire bite".

I am still contemplating either trying my hand on some red lips and vampire teeth for her myself or outsourcing the task to someone who's quite probably better at it.
Even that doesn't happen, however, I am really happy with my dark beauty!


Update April 2024:
I finally tried my hand at a vampire smile, but after many attempts, I gave up on the teeth because they didn't go together with the eyes, and I really didn't want to mess up the eyes. A wide smile didn't fit and just two white dots looked ridiculous, at least to me, as if she had crumbs on her mouth or something.
The red lips, however, work much better with her overall look than the pink ones did!


Angie and Dawn were registered trademarks of the Topper Company. I am not affiliated with Topper in any way.

7/15/2022

Demon guardians

Told you there would be more wings! I had had no idea what they would look like, but once I glued the skulls on, they called for bat wings ... and of course sequins. Will I ever be able to make wings without them again?
The first earring took me longer than I care to admit because I had to experiment a little and rip some beads out again. Despite my usual problems with making a second earring that matches the first one, though, that's not a problem with bead embroidery for me at all, so the second one went faster at least.

I am thinking about making variations of these with my dark grey and my crystal AB skulls, with different wings.
What do you think? Are you tired of my bead embroidery already and would like to see other techniques again?

Here's a short video to show you the beauty of the black AB sequins shimmering in the light. I actually managed to upload a ten second video to YouTube, can you believe it, lol?
Please ignore the background noise that my old camera makes. I tried to turn the sound off, but the tips I found didn't work, no idea what I did wrong. I'm such a natural at this. Not!


7/13/2022

Light butterfly

In September last year I made a black moth. I have always been attracted to black animals, birds, dogs, bunnies, and of course cats (okay, so cockroaches may be an exception). I bead embroidered the moth with wings full of sequins in different black tones, shiny, matte, AB, it was so much fun.


Only a few weeks later I decided to translate the idea into color with a big exotic butterfly from a beautiful glass cab and many differently colored sequins.

Both pieces sold quite quickly and I never got around to blog about them (that's a euphemism for my being too lazy or not motivated enough to blog much at all).

A few days ago I went through one of my inspections again and chose another old piece for ripping up (I wish my mind wouldn't tell me that they are in that drawer crying for help "nooo, don't do it"). While I was busy doing that, I remembered how I made it. It's funny what people use to measure the time of working something. For me it's usually movies or episodes of TV shows, in this case X-Files and the 1960 version of "The Village of the Damned".
My thoughts kept roaming and finally led me to these two winged creatures, probably because in one of my FB sale groups our topic was "Butterflies" at that time.
I love to make wings and I love the effect of sequins.
Not black this time, no colors, how about white and silver? After all I had a whole bunch of seed beads in white tones and silver right before me.


That's how the light butterfly came to life. I don't know if he was born from light or if he's bearing light, but I could easily spin a few fantasy stories around him.

Now don't worry, my dark side hasn't disappeared, actually I grabbed two of the black skulls right after. More wings, I'm afraid.
Who knows, though, what will come after those? Maybe another ripped up piece will talk to me and tell me something completely new!

7/01/2022

SilhouetteCat and the mermaid

No, they are not a couple even if the title makes it sound like that ;-) Although you never know if they have met under a full moon, SilhouetteCat sitting at the pier maybe, looking down on his friend who has come from the depth of the ocean to say hello? I wonder what kind of conversation they would have.

Let's start with SilhouetteCat.
If you have followed me for a while, you may know that he is one of my favorite HeatherCats and I have made several versions of him.
This one is my second bead embroidered version and the first one in color, all because I couldn't resist turning a shimmering checkerboard cab into a moon.
I hadn't planned a HeatherCat. My first thought had been a tree "holding" the full moon, but luckily I used a big piece of backing as if Mabel, my muse, had been whispering in my ear that a moon needs a cat ...
Once I had beaded the bezel for the moon and added some rows around it, I knew that it reminded me of Heather's SilhouetteCat.


So I added the black cat -  with the body changed a little because I didn't want him to reach up to the moon.
Now some stars. In bead looming, my night skies often have dots for the stars, but this moon was so big that I felt they needed to be bigger, too. I didn't have any cabs that would have worked, though, so I went with more circles (that's probably why people are reminded of Van Gogh's "Starry Night", but if you have a closer look, you see it's not really that similar and it was not my inspiration).
It was also fun to add the fringe. I still have tons of those dagger beads from when an old project fell through, and the color was perfect.

Then I was at the usual point, what kind of rope to use. Of course I thought of my beloved Herringbone, but neither the 4 bead nor the 6 bead rope appealed to me this time because the different blue tones had different sizes.
I remembered, though, that I had just got some faux suede ribbon and there were still a bunch of crimps from my early bead looming days, and indeed the braids looked much better.
Now I'm really happy how the whole piece turned out!


And the braids actually brought me to a WIP that has spent nine months in my infamous WIP drawer - my mermaid.
I hadn't even posted about her here because I thought she would be done much earlier, but I had had the same problem with the rope. Bead loomed strips didn't sit right, the Herringbone ropes didn't look right.

Luckily the other spools of faux suede that I got were a dark teal and a light blue which went perfectly with the colors I used in the mermaid's tail.
Actually, the first idea had been to make just a fish tail with all those sequins, but a tail by itself always looks so cut off, so instead this large mermaid started evolving, getting more and more hair and this big fish tail. It was fun ;-)

It's amazing how satisfying it is to finish a long time WIP because the right idea has finally come along and I'm very glad she made it out of that drawer that has proved to be the end of the line for some other pieces over the years.

12/31/2021

Tackle that stash - Bead embroidered "Elizabethan" lady

In early November, I have told you why I have been missing from my blog for a while. One of the reasons was der Dekan, my kitten. He has grown to be a little less demonic, but of course still needs a lot of attention, so the only way to get creative is to shut him out or wait until he is very tired and then be prepared for that moment.
If I'm working on something, it can take me a few hours, and at this point, I would really feel bad about locking myself in for that long leaving the little demon outside waiting, especially since Gundel has demanded alone time of her own for some hours of undisturbed sleep. So I tried for the sleep mode time instead. It turned out that I'm never prepared because, well, I never know what I'm going to need when going on a creative adventure. Standing up, however, means that der Dekan is going from sleep mode to "let's play, throw that ball, can I attack you, no, don't pet me, here's the ball back, look what I found, can we play some more" mode.
Of course it's not just a matter of attention. Der Dekan is obsessed with my beads and thread and wire, just as any kitten would be, and he's so fast that I don't trust him around my stuff unless I can tell he's too tired to move. This is a matter of safety, that of the beads, but much more his own.

Yesterday, though, the unthinkable happened. Not only did der Dekan decide to give me hours to play by passing out cold next to me in a way only cats can do it, but I had everything I needed.
It was great. I hadn't even known how much I had missed my beads and the calming effect that playing with them has on me. I have been quite stressed out lately and while beading doesn't make the stress appear, it gave me a much needed timeout.
Not knowing at all where a design will be going can mess things up if you get stuck, but seeing something finished and not having the slightest idea where that design has come from is what I love most about being creative.

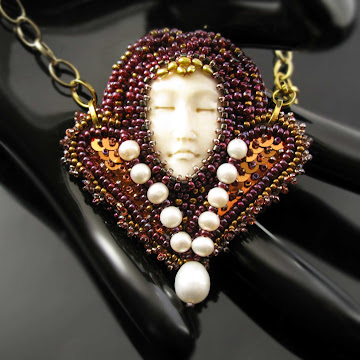
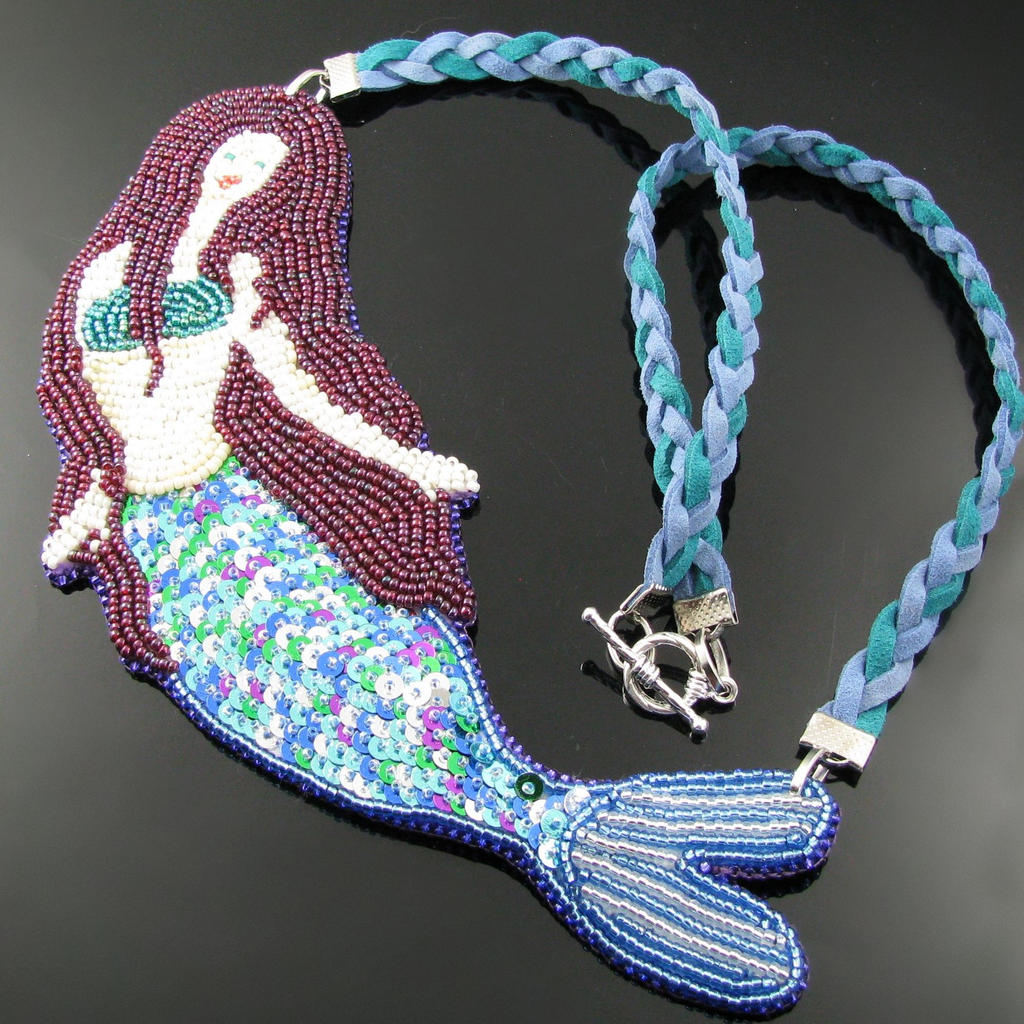
This lady started out with a carved face glued to a piece of Lacy's Stiff Stuff and a peyote bezel. This particular transparent dark red with AB finish has become a huge favorite of mine, especially in a combination with the metallic bronze.
I think my first idea was to give her hair, but with the red bezel all around her face it turned into some kind of embellished headdress instead that reminded me of an Elizabethan hairstyle which probably inspired the collar like part which led to the sequins - in a different color in order to add a bit more depth to the design - and pearls in the end.
Is she a little over the top? She sure is, but I guess she - and I ;-) - needed that!


2/05/2021

The Fairy Queen

Do you remember Dawn, my little Topper doll? After having her lying around without clothes for years because 1. I didn't even know back then what or who she was, 2. I had no idea where to get clothes for her, I had finally made a fancy little dress and accessories for her out of seed beads.
As Dawn is only 6 1/2 inch - compared to the 11 1/2 inch of a Barbie and 11 1/4 inch of a Francie - it may not be instant gratification to make something for her, but it's definitely quicker. I couldn't help myself and had to get more Topper dolls, two more, to be exact.
After making the dragonfly pin, I knew what I wanted to do with one of them.
Dawn was to become a fairy!
Only she's not really Dawn, but one of her friends as the head mark 11C as opposed to 11A told me. She's Jessica who used to be a stewardess (yes, that's what it was called back then). It's kind of funny because last time I had thought that Dawn was a Jessica, and now I fell for it the other way round. I should have noticed that her hair was not as full, but I'm so used to different Bubble Cut hairstyles on vintage Barbies that I simply didn't think about it.

As usually, I made the dress first.
What do you think of when thinking of a fairy? Tinkerbelle? Flora, Fauna and Merry-weather from Sleeping Beauty? Cinderella's fairy godmother? Oh, no Disney fairy at all? Maybe one from a fairy tale book you read as a child? From a fantasy movie?
Do you imagine a long dress, a colorful hat that reminds of a witch's hat? Something short and green? A cloak with a big bow? Something glittery? Something colorful like flowers? That's the fun part about it, your imagination is the limit.
My imagination sent me to a combination of reds and browns with some gold mixed in. I made the dress using the Herringbone technique which has proven to be the most versatile so far, at least for me who's not that much of an off loom beader (yet?). I like the "pleats" in the skirt and hope to be able to reproduce this in a bigger dress eventually.
This time I forgot to take a picture of Jessica just with the dress on, but I'll get to the accessories again later.


Next were the wings. It's two sets of wings which I made in the bead embroidery technique with golden seed and bugle beads. Instead of enhancing the golden look as I did in the dragonfly wings, I used tiny clear AB seed beads with the sequins here.
Sewing the wings on was quite a fiddly thing to do, especially with the arms constantly getting in the way. The hard part was also to sew them on in a way that wouldn't make them move too much, after all I don't want them to fold up in the back, so you won't be able to see them.
I would say this part challenged my patience the most, and yes, there was swearing!
Here's a close-up of the wings.


My first thought had been to give my fairy a wand, but the typical wand with the little star on top seemed a little stereotypical. Instead, I decided on giving her a long staff, something sturdy, something to emphasize her power as a queen even more than the little golden crown of seed beads and coated hematite.
After thinking for a while, I remembered having wood skewers left over from my polymer clay days. I used size 15 seed beads to cover one of them in peyote, going from coated clear beads at the bottom to golden ones at the top.
The Swarovski crystal came in very handy although the story goes that it's really a citrine found by the dwarves and gifted to the Queen of the Fairies ;-) I could have used the same one in a smaller size, but the Queen made very clear that she didn't think small.
For the connection between staff and crystal I glued on a thick layer of golden seed beads to strengthen the thread connection. It was one of the rare times when glue and I made up a good team!
The staff is attached to the hand by means of a little bracelet and I can even move it into different directions without it falling off.


Last but not least came the everlasting struggle with the shoes. As I had already mentioned in my post about Dawn, the Topper dolls have tiny feet thanks to their size. Once again I tried slippers like I made them for Francie before, I tried to make the soles in different sizes and use differently sized beads, but to no avail. Even when I admitted defeat and got back to the sandal design, I still had to experiment with that.
This is attempt #6, I think, the one that finally made me happy. They stay on her feet and they fit the outfit. I didn't have a golden thread, but I have a gold metallic pen coming to cover it and even like this the "golden yellow" was still the best choice.


Thank you if you have made it to here. I'll end this post with a picture that is giving you a better idea of the Queen's size. This is an ordinary step on my stairs, so you see that our fairy is indeed one of the "small folk".
Don't let it deceive you, though, I'm sure she knows how to use that staff, for magic or to hit you with it! ;-)


Dawn was a registered trademark of the Topper Company. I am also not affiliated with Topper in any way.

1/31/2021

The Dragonfly

I have always loved dragonflies. They are like small flying jewels.
I know they sew your lips together if you believe Snoopy ;-) but actually this is just an old superstition as the Britannica tells us: "
The term devil’s darning needle is derived from a superstition that dragonflies may sew up the eyes, ears, or mouth of a sleeping child, especially one who has misbehaved." I've never heard of this superstition in my area, but I know that some people thought a dragonfly could sting or would drill into your eyes.

At the Jewelry Artisans Community we have a bimonthly challenge and the first one of this year - take a look here - was to try out something new, a new material, technique, or tool.
My first thought had been to finally use my Kumihimo disks, but somehow I just didn't feel like it. I don't have the right weights or spools and on top of that I have been too lazy to check out how exactly it's done.

Then, inspired by a documentary about embroiderers in India that I have watched a while ago, I thought of sequins. As I don't sew, I had never used sequins before except in a very short polymer clay jewelry venture with a friend 30 years ago. In fact I'm not even sure if I used them, but I had some scattered in my old stash boxes at some time.

What to do with sequins, though? Well, I love dragonflies ...
I looked through dragonfly pictures and I looked through my stash to decide on a color combination.
There was this acrylic cab on which I then based my choice of seed beads. Luckily I had everything except the sequins in my stash and could start right away while I was waiting for the sequins to arrive. It was more difficult than I had expected to find what I wanted, 4 mm clear AB sequins.
I had already decided not to make the body from single bigger beads, but to embroider the whole piece. For the wings and body I used seed beads in different sizes and different gold tones plus black and alabaster white, also gold lined bugles, and for the head I used gold coated hematite beads and bronze Twin Bead eyes.

To enhance the overall golden look, I chose to sew the sequins on using the method of adding a bead on top.
This is the end result. Almost.
I took this picture in my hand to show the size. Now what? I didn't trust an ordinary small needle to work. I hate big brooches with small needles. A necklace?

A friend convinced me that my dragonfly would make a good pin and advised me to check out hat needles etc., and that's what I did.
I found some that had larger filigree disks attached to the pin which I could sew to the backing easily and, which is much more important, safely.


Unfortunatley it's a rather grey day today and although I could see a beautiful green shimmer in the sequins at one moment, my camera wasn't able to pick it up. You'll have to believe me when I'm saying that the wings shine in different colors and are more beautiful in the pictures.
Here's a closer look at them, by the way, to show you how the sequins are sewn on.


I have to admit it was much more fun to work with sequins than I had expected, so much actually that I already used them again on a second project that you will get to see soon, I hope!