Showing posts with label doll accessories. Show all posts

2/13/2023

Autumn Dawn

A small tin with old bead soup in autumn colors called to me this weekend. When the beads call, you have to listen and I did.
I happened to have a doll in my beading box - because who doesn't - and could start right away, then one thing led to the other.
Let me introduce Autumn Dawn. I think it's quite obvious how she got her name wearing those colors although it's probably more like late summer, walking around sleeveless, in crop top and sandals like she does!


Actually, the name is a little misleading. Just the head is from a Topper Dawn, the body is from a Dawn clone marked "Hongkong B & G" about which I couldn't find out anything. The doll came to me like that, I don't know what fate brought those two parts together.

I think I have mentioned before that I often start with the bottom part of an outfit, in this case with the skirt that I made from the bead soup. As the beads not only had different colors and finishes, but also differed in size, I opted for a colorful  tiered skirt with wide folds to hide the irregularities a bit.


Next were the sandals. As the bead soup had not been enough for a floor length skirt, they were much easier to do than the shoes usually are when I have once again forgotten to bead them first and don't have much space for working.
Autumn Dawn's one foot is a little straighter than the other one, so to make sure the sandals would stay on, I beaded the wide straps at the ankles (my first odd count peyote, by the way).


The top is a new design. Usually I start working from the waist, either directly on the doll working my way up, or I make a front and a back part working from the bottom up and then join the seams at the sides.
This time, however, I made the peyote back part sideways and then extended it on both sides, finally joining them in the front which resulted in a crop top. Two straps on both sides made it sit really well.
To give it a little extra, I added the bronze drop beads at the front and sides.


Dawn likes accessories, but a necklace would have been too much, so she only got two little bracelets from different beads.


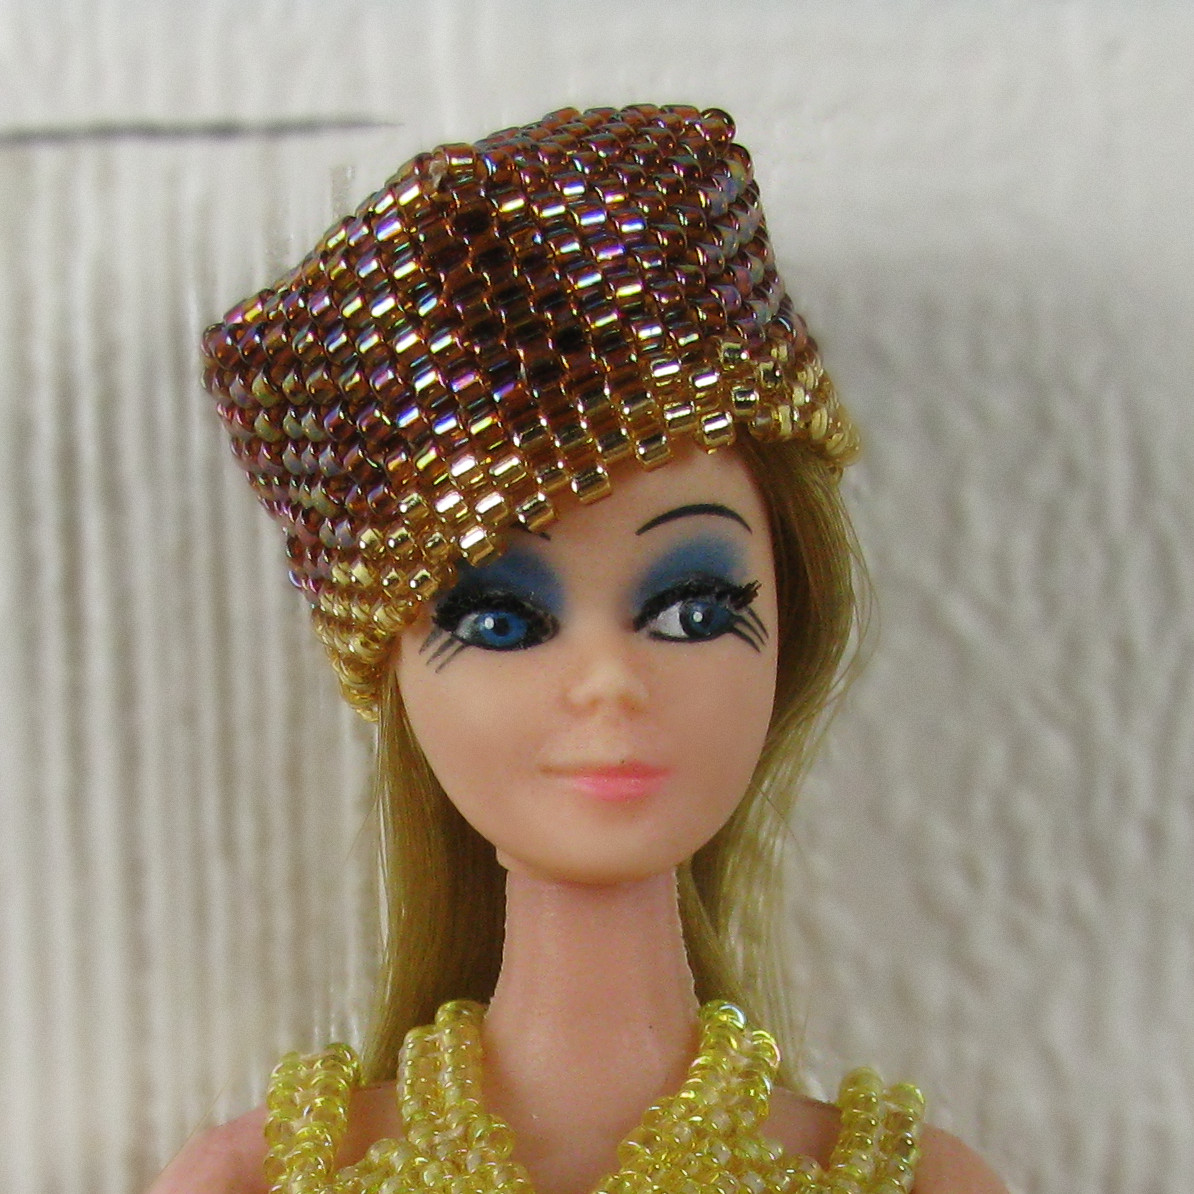
The hat. I can't resist a hat and my excuse is that Dawn's hair refuses to stay in place. This hat from gold lined and amber AB beads was mostly inspired by the amber beads' limited number, but also by one of my favorite Murphy Brown episodes. I was so tempted to add a tassel, follow the link and you'll know what I mean.

Last but not least, the purse. For someone who only carries around her beloved shopper, I am definitely obsessed with beading purses, totes, etc. for my dolls.
I chose the color to resemble linen, with matte "leather" for the strap, and embellished the purse with small golden spacer "flowers".


There you go - Autumn Dawn :-)

Dawn was a registered trademark of the Topper Company. I am not affiliated with Topper in any way.

5/29/2021

Miss Francie Bennet - Part 2, The accessories

Welcome back!
In this post I want to talk about the accessories for Miss Francie Bennet - the 60s doll who has been thrown back into Regency times.

As always I had no definite idea which accessories I would make when I started this project.
Of course I knew Francie would need a pompadour, almost all of my dolls get some kind of purse or tote or handbag, except the first two Flappers.
She would also need a hat, that was the part I was afraid of the most because I had no clue how to make a Regency bonnet.
And for going out a shawl would be nice.
That was as far as I planned ahead.

As my big JaLa loom is still occupied by a WIP that I'm not sure about anymore, I decided to use one of my small looms for the shawl. After some quick measuring I figured it would be just big enough for the triangle shape I had in my mind.
It was close, very, very close. In fact I wouldn't have been able to finish the shawl if I hadn't opted for the triangle because I almost ran out of warp space at the bottom.
What I also had not taken into account was that glass beads are heavy and loomed items very slinky. The shawl slid off Francie's arms at the slightest movement, so I had to put in a few stitches to secure it.


Then I suddenly had the idea to give her a parapluie, obviously because I believe in punishing myself.
My test piece was bead embroidered, but the shape reminded me of cocktail umbrellas, so I had the idea to make strips in Herringbone instead, sew them together and, well, wing it from there.
The little parapluie has nine strips which I sewed together on the inside and extra at the ends to emphasize the seams. A little hole which I wanted to use for the shaft remained at the top. So far, so good, but of course this construction wasn't completely firm. I took a deep breath and put glue all over the outside and inside to reinforce it. That sounds easier than it was, of course it got a little messy. Glue and I - the endless story.
In the end, however, I had a nice firm structure, yay!
I added fringe all around and finally the shaft (for which I beaded around a wooden skewer like for the Fairy Queen's staff) with a golden end top and handle. VoilĂ .
Francie can't hold this parapluie because she can't grip it and she can't bend her arms, so the plan is to either just put it in front of her or maybe add a strap, so it can dangle from her hand.


After this exhausting part of the project I needed to make something small, Francie's pompadour.
There's not much to say about that, you have seen variations of it before.


I had saved the biggest challenge for last - the bonnet.
Two things were clear. It had to be built up from several parts, and to make it sturdy enough, it had to be bead embroidery.
I looked at all kinds of Regency bonnets and explanations. Of course soft crowned ones were out of the question for me as I don't know anything about embroidering on fabric, it had to be the stove pipe kind.

Then I tried to keep everything that I had seen in mind and cut and bead embroidered three of the parts, sewed them together and glued on the Ultrasuede afterwards. This is a very short description for what took me a few days with the sewing and glueing being most difficult.
I also added some wire to the front part which helps to shape it, well hidden under the Ultrasuede.

The fourth part was even harder to deal with because I had to embroider it first and then glue it to the "stove pipe" as it would have been impossible to do that from the inside. There was no way to hold the glued edges together, it would have needed tons of pins to keep the shape. So I had to manage with my fingers and finally it stuck on the way it was supposed to. After it had dried, I added some pink lace on the back which also served to support the glued edges.

The last task was to sew on two rows of lace at the front, a ribbon around the stove pipe piece - again, as an embellishment and to secure the glued parts - and the ribbons to tie under the chin if wanted.
That too sounds a lot easier than it was. I tried several variations for the lace and the ribbons until I was happy.
Now I may have to make a little hat pin to make sure the bonnet will always sit well.

All in all it took me about three days to make the bonnet and I don't see myself making another one very soon! ;-)


And now here's Francie in all her beaded glory.
It was a fun project, a frustrating project at times, it took patience, fantasy and, I'll be honest, some cursing, too.
There were moments when I thought I wouldn't be able to finish it, but now I'm very happy that I pulled it through!


Francie is a registered trademark of Mattel, Inc. I am not affiliated with Mattel in any way.

4/24/2021

Is it the 80s? Part 2

Welcome back to Barbie's fashion show!
Yesterday I told you a little about her and her clothes, today is all about her accessories.

As usual, I started on the shoes first. I didn't know what I would be in for ...
Funtime Barbie has quite long, but very slim feet. I can relate to long feet, mine are, but I almost got jealous of them being so slim. That didn't last for very long. It seems that she has just about as many problems to find shoes that fit her as I do.

You can't see it that well here, but Barbie was made for fun times on very high heels it seems. I should probably have taken a comparison picture with one of the others, maybe I'll do that eventually. So far I had worked with only one pair of "high heel feet", the first time I beaded a doll outfit for my Flapper Barbie, and for those I got a pair of Mattel shoes from my sister which worked nicely. Only afterwards I began beading the shoes as well, simply because I couldn't find shoes for my Supersize Flapper Christie, well, actually those were wire knit and crochet with beads and she has rather flat feet compared to Funtime Barbie.
I tried one pair with heels, but my plan didn't work out by a few millimeters - I'll let you know if it ever does - and I liked the idea of slippers or sneakers better, anyway.
No kidding now, sixth time's the charm (and yes, I had hoped for third at least). I was ready to go all Grimm's "Cinderella" and cut her toes off (Rook di goo, there's blood in the shoe ... you know what I mean?)!
In the end, however, I made it. I'm not gonna let a pair of tiny shoes beat me. Ha! You may wonder what the problem was as they remind of those that Francie Dietrich is wearing which they do, they just were muuuch easier to adapt to Francie's flat feet.
If I hadn't been so worn out, I would probably have tried to give the shoes laces, but I was afraid that I would mess everything up again now that I had finally beat the enemy!
Oh, and a P.S., ignore the "pin pricks", vintage Barbies tend to have those on their legs.


Now to Barbie's hair.
I told you that Funtime Barbie came with pigtails. She had a lot of hair in some spots, and I think I washed, combed and cut her hair a whole day long, including pulling out some to make her hair lie flat. Let's put it like that, in the end her hair looked nice and not even crooked, but it refused to lie flat. The problem wasn't new, in fact I had had used wire to give her a ponytail when she still wore the wire dress.
So how about a hat? In my surprise bead mix there had been that beautiful dark red which would go well with pink.
I had two hats with a ruffled edge in the 80s. They cost 2 DM each and I loved them. Then a friend decided he had to have one of them, he looked so funny with it that I couldn't say no, and I had only one head, anyway ;-)
The difference between my hat - made of hemp, I think - and Barbie's was that I didn't have a hatband on mine and mine had a rounded crown instead of a flat one and was a lighter red.
By the way, the hair only looks crooked in the back because one strand is caught in one of the ruffles.


If you have known me for a while, you know that I don't tend to brag, but I am really, really proud of Barbie's sunglasses. They are not perfect, but I'm happy to have had the idea and making it work. I couldn't have done it all alone, when I looked for an idea what to use for the lenses, my sister had the right one - photo negatives!
I picked one from the end of a film that had almost nothing on it, cut two pieces, glued them onto the wire frame - whose arms really go around the ears to hold the glasses in place, by the way - and cut the excess off.
This is definitely something I'll have to keep experimenting with!

Barbie could also take her glasses off and put it into her purse. I am almost sure that the purse is "woven" even if I can't put my finger on what exactly makes me think that, it's probably a memory somewhere in the back of my mind.
Look, she even put her favorite charms on it.


You know that my dolls can't go without at least a little piece of jewelry, often a cuff, a choker, or a necklace. A necklace wouldn't have worked in this case because of the straps, so Barbie is only wearing a sweet little cuff. Anything else would have been too much.


I just noticed that I haven't said anything about the beading technique that I have used. This time only the shoes are a mix of Herringbone and Peyote, everything else is done in Peyote.

Well, we are coming to the end.
Thank you for sticking with me, I hope you like what you have seen and are looking forward to the next doll project. I know I am!


Barbie is a registered trademark of Mattel, Inc. I am not affiliated with Mattel in any way.

3/21/2021

Bead embroidered miniature bag

Usually things go the other way round. I make a doll outfit and then I make accessories going with it. I guess this time it won't work like that, but it hasn't been planned that way.

In fact I am working on a Barbie doll outfit at the moment, on the top, to be precise. In the middle of this project, however, I ran out of one bead color. No problem, who doesn't like a bead order? I like to optimize my bead orders, though, so I'm still listing what exactly to get.
In the meanwhile I started on a new idea, a bead embroidered handbag for Barbie. I have made bags on the bead loom and in brick stitch and peyote before, but I wanted this one to be sturdier, with a lining, one that she didn't get from the department store, but from a bag store. It's really kind of funny because I would never think of going to such a store
myself, all I need is my trusted kitten tote.
Just so you know, Barbie didn't like her new handbag and I get why. It quickly became clear after I started beading that it wouldn't work with her outfit in colors and style, so she's going to get something different eventually.

My plan was not to make this bag flat like the totes I had made before because I wanted to put something (whatever that was going to be) inside.
I started by cutting out the backing for the beads, a large rectangle marked with smaller ones for the front, the back, and the flap, with smaller pieces for the sides of the bag. I would bead the surface, sew on Ultrasuede for the lining, and then fold everything up and close the seams.
It sounds easier than it turned out to be. While my measurements weren't wrong, I hadn't calculated how much thicker the beads and the Ultrasuede would make my piece which made it harder to fold up and sew together right. For example, I would have wanted the flap to be a bit longer which it would have been on a flatter piece.
I wanted a kind of button or hook sewn to the front to go through a hole in the flap to close the bag, but because the flap wasn't as long as planned, I had to settle for the strap instead.

There were a few more things I learned while sewing up the seams, so if I'll ever make another one, I'll know what to pay attention to beforehand.
I'm still very happy with the result, though, I just wish it hadn't taken me so much longer than I had expected. Not that that doesn't happen to me all the time, thinking about it ;-)
I have already been contemplating other ways to make miniature bags.


As Barbie has decided not to use this bag, Jessica has taken a look. She said she needed an overnight bag and thinks it will work nicely. She tested it with a short dress and a blouse. And now she wants an outfit going with this.
Putting my thinking cap on in 3 ... 2 ... 1 ...