Showing posts with label Francie. Show all posts

5/29/2021

Miss Francie Bennet - Part 2, The accessories

Welcome back!
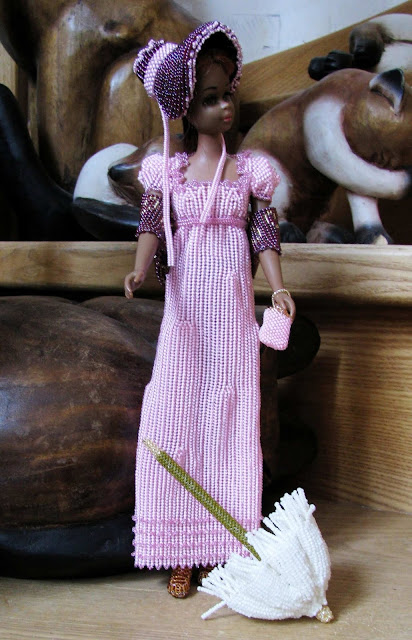
In this post I want to talk about the accessories for Miss Francie Bennet - the 60s doll who has been thrown back into Regency times.

As always I had no definite idea which accessories I would make when I started this project.
Of course I knew Francie would need a pompadour, almost all of my dolls get some kind of purse or tote or handbag, except the first two Flappers.
She would also need a hat, that was the part I was afraid of the most because I had no clue how to make a Regency bonnet.
And for going out a shawl would be nice.
That was as far as I planned ahead.

As my big JaLa loom is still occupied by a WIP that I'm not sure about anymore, I decided to use one of my small looms for the shawl. After some quick measuring I figured it would be just big enough for the triangle shape I had in my mind.
It was close, very, very close. In fact I wouldn't have been able to finish the shawl if I hadn't opted for the triangle because I almost ran out of warp space at the bottom.
What I also had not taken into account was that glass beads are heavy and loomed items very slinky. The shawl slid off Francie's arms at the slightest movement, so I had to put in a few stitches to secure it.


Then I suddenly had the idea to give her a parapluie, obviously because I believe in punishing myself.
My test piece was bead embroidered, but the shape reminded me of cocktail umbrellas, so I had the idea to make strips in Herringbone instead, sew them together and, well, wing it from there.
The little parapluie has nine strips which I sewed together on the inside and extra at the ends to emphasize the seams. A little hole which I wanted to use for the shaft remained at the top. So far, so good, but of course this construction wasn't completely firm. I took a deep breath and put glue all over the outside and inside to reinforce it. That sounds easier than it was, of course it got a little messy. Glue and I - the endless story.
In the end, however, I had a nice firm structure, yay!
I added fringe all around and finally the shaft (for which I beaded around a wooden skewer like for the Fairy Queen's staff) with a golden end top and handle. VoilĂ .
Francie can't hold this parapluie because she can't grip it and she can't bend her arms, so the plan is to either just put it in front of her or maybe add a strap, so it can dangle from her hand.


After this exhausting part of the project I needed to make something small, Francie's pompadour.
There's not much to say about that, you have seen variations of it before.


I had saved the biggest challenge for last - the bonnet.
Two things were clear. It had to be built up from several parts, and to make it sturdy enough, it had to be bead embroidery.
I looked at all kinds of Regency bonnets and explanations. Of course soft crowned ones were out of the question for me as I don't know anything about embroidering on fabric, it had to be the stove pipe kind.

Then I tried to keep everything that I had seen in mind and cut and bead embroidered three of the parts, sewed them together and glued on the Ultrasuede afterwards. This is a very short description for what took me a few days with the sewing and glueing being most difficult.
I also added some wire to the front part which helps to shape it, well hidden under the Ultrasuede.

The fourth part was even harder to deal with because I had to embroider it first and then glue it to the "stove pipe" as it would have been impossible to do that from the inside. There was no way to hold the glued edges together, it would have needed tons of pins to keep the shape. So I had to manage with my fingers and finally it stuck on the way it was supposed to. After it had dried, I added some pink lace on the back which also served to support the glued edges.

The last task was to sew on two rows of lace at the front, a ribbon around the stove pipe piece - again, as an embellishment and to secure the glued parts - and the ribbons to tie under the chin if wanted.
That too sounds a lot easier than it was. I tried several variations for the lace and the ribbons until I was happy.
Now I may have to make a little hat pin to make sure the bonnet will always sit well.

All in all it took me about three days to make the bonnet and I don't see myself making another one very soon! ;-)


And now here's Francie in all her beaded glory.
It was a fun project, a frustrating project at times, it took patience, fantasy and, I'll be honest, some cursing, too.
There were moments when I thought I wouldn't be able to finish it, but now I'm very happy that I pulled it through!


Francie is a registered trademark of Mattel, Inc. I am not affiliated with Mattel in any way.

5/28/2021

Miss Francie Bennet - Part 1, The doll and the dress

Some projects take a little longer than others. In this case, little means more than five years. That's how long Francie had to wait for her beaded outfit.
I think it was worth the wait. My first try at looming her a particular style of outfit went completely wrong, but now I knew how to use different techniques to give her her (or rather my ;-)) dream outfit.

Let's talk about Francie first, however, because this one is special.
"Colored Francie" (#1100) came in two issues in 1967 and 1968. She had a twist waist, bendable knees, and rooted eyelashes. The difference between the two issues were the hair and eyes. The first one had red hair and reddish-brown eyes, the second one had dark brown hair and eyes and a darker skin tone.
There was just one problem. "Black Francie" as she is known among collectors may have had the skin, but she didn't have the features of a true African American doll because the mold of the Caucasian doll had been used. The doll didn't sell well and so wasn't produced in large numbers. Probably African American children just couldn't identify with her which is understandable. It's why Christie is often regarded as the first real African American doll.
That makes her one of the most sought after Francie dolls (after the Japanese specials).

My girl (Francie is supposed to be a teenager) is the first issue. She has a few problems - so do I and after all she's just two years younger than me! She has some nicks on her foot, some light scratches here and there, and not only has she lost some of her hair over the years, but some of it looks like it has become burnt and has shriveled up and some of it is kind of orangey.


I was not brave enough to risk the hair she does have, so she didn't get a new hairstyle. I didn't touch her bangs and for the ponytail didn't dare playing with beads, but used just a bit of string because even light combing cost her more hair. Re-rooting was not an option, though, I would only have done that if she had been mostly bald, also I had planned a hat for her.
It's not as if the outfit is historically correct 100 %, anyway. There are things that are hard to recreate in beads, but I have done my best.

Now why do I call her Francie Bennet?
I'm a fan of Georgette Heyer's books, especially the ones set in the Regency period (1811 - 1820), and I love Jane Austen's "Pride and Prejudice". From the start I wanted this special doll to wear something special although I knew it would be a bit of a challenge. Her name is of course inspired by Miss Elizabeth Bennet, the protagonist of "Pride and Prejudice".

Today I'll show you her dress.
My original choice of color had been pink and grey. Although I'm not necessarily a big fan of pink, pink and grey has been a favorite color combination of mine ever since I had to crochet my very first chain stitch string bag in elementary school.
Like I said, I had already tried a loomed version with Delicas, but although I had measured more than once, it just didn't work out. I took the parts of the loom and left them in a drawer to die. Yes, I was mad. Eventually I gave myself a good kick, cut the parts up and used the beads in both my Flapper Dawn's and 80s Barbie's outfits.
For the next attempt, I chose seed beads instead of Delicas because they look nicer in Herringbone. Don't look for the grey beads, in the end I decided the contrast was too much and I'd rather play with colors in the accessories (as a matter of fact, however, the grey beads are hidden under the dress in some kind of underpants, shhh).


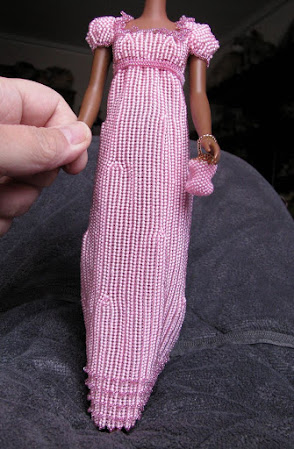
Miss Bennet's dress is made from pink lined crystal beads. I love them, in the light the crystal parts sparkle so beautifully! Unfortunately I didn't quite manage to catch that in pictures.
For a very subtle contrast I chose sparkly rose colored 15/0 seed beads for the ruffles around the neckline, the lace at the bottom of the dress and the ribbon that is sitting right under the bust and ends in a bow at the back which is hidden by the shawl, though, which you will see tomorrow.
I couldn't believe how long it took me to make the dress, but Mattel dolls do have long legs and here it seemed even longer because of the high waistline!


A real problem were the shoes.
Had Francie stayed inside, she would have worn shoes with a very pointy tip, a side seam, a rounded kitten heel ... all things that I couldn't recreate in beads or things that wouldn't stay on Francie's feet, and of course there were still her foot problems.
So I settled for some boots instead, in honor of the scene in the famous 1995 mini series "Pride and Prejudice" in which Lizzy Bennet is walking across the fields through the mud to visit her sick sister in Netherfield Park.
I was even a little tempted to add brown beads for mud to the seam of Francie's dress *lol*
Of course these boots are by no means perfect, but they were the best I could do, and believe me, I tried. I think I made at least six shoe versions once again and there was
massive cursing. I tried 15/0 beads to make the "leather" look thinner, I tried slippers that went high up to hide the feet, to no avail.
If Francie wants to wear brown basketball boots, so be it. I wear comfy shoes myself. Maybe I'll have an amazing idea one day, but actually you can hardly see them under the dress, anyway. For this picture I pulled the dress up.


Okay then, that's it for today.
Tomorrow I'd like to show you the accessories I made - besides the pompadour that already sneaked in with the second picture.
I hope to see you then!


Francie is a registered trademark of Mattel, Inc. I am not affiliated with Mattel in any way.

9/05/2020

A new outfit for Francie

This is the story of Francie who came over as a gift from the US months ago (warning: it's going to be a long post). I don't have that many Francie outfits that are not already worn by the other dolls, and on top of that this girl has a major problem with her knees as you can see.


This particular doll is a Bendable Leg Francie, but you won't be surprised to hear that she is not able to hold that bend anymore. It rather looks like she had had to bend her legs too often, in fact one leg also has splits in the back, and I was a little afraid it would break off while working on her.
Usually you would use a doll like her for a body part donor or try to find a donor for her, but I thought for everything she obviously had to go through - children can be so tough on their dolls, I should know looking at my own Stacey - I'd give her an outfit to hide her knees instead.
First of all I washed off the grime of years, mostly off her legs. It was a surprise that the rest of her body and the head still looked quite good in comparison, and her face was beautiful with the rooted eyelashes still being perfectly full.

I started the jumpsuit in the same way as the last dress I made, with a bodice beaded in the Herringbone technique. The original plan had been to make the bodice completely in a gunmetal color, but I wasn't sure if I had enough beads, so there's a gunmetal strip at the waist now to separate the bodice from the legs.
So the bodice is now made from size 11 seed beads in a rich dark blue mix combined with size 15s in a very light shimmering blue.
Since I didn't want this to be an evening outfit, it's neither strapless nor does it have thin straps. In fact I even contemplated a turtle neck for a bit, but it was so hot when I worked on this part that I couldn't get myself to do it! I am weird that way, I do imagine what an outfit would feel like if I wore it. Beading all the way to the top gave me one or the other problem with the armholes, also because - as mentioned before - it's not easy to work having to hold the whole doll. It's amazing how limbs tend to get in the way!


The real problem, however, would be the pant legs. I had worked it all out in my mind ... how to work down to a particular point and then increase the pattern between the legs and bead down from there on both sides. I figured it would be hard to get started, but I really underestimated the task completely. The gap between the legs simply wasn't big enough to add the row of beads from which I wanted to work down, at least not to make it look good. I tried several times, but in the end I had to give up on it.
The new plan was a mini skirt and overknee boots. For decency I did add a small strip of beads between the legs which later proved to be completely needless. At the skirt bottom I added some gunmetal beads, like a little trim. These few beads will be important later.

Then I began beading the boots. In the end I had made them three times and ripped them up in parts or completely every time because they were kind of okay, but kind of okay simply wasn't good enough. I was so glad, though, that the legs survived that ordeal because I kept taking the boots off and putting them back on in my futile attempt to fit them perfectly to the legs. In the third attempt I added the part for the feet and that's when my scissors went crazy for good. It's strange how frustrating yet relieving it can be to cut up something you are not completely happy with!
Now if Francie didn't get boots, it had to be a long skirt or pants after all. The thought of making yet another tight skirt - after all the top part was already tight and I wasn't prepared to cut that up again as well - didn't appeal to me, though, and I had already failed with the pants. What to do?
That's when I had the idea of the bead tubes for pant legs which I would attach to the skirt part. I only wished I hadn't put "the trim" on, but how about turning that into a fun detail, maybe a hint of lace?
I also ripped the first tube up twice because I had to try out if I liked bell bottoms better, but in the end I found I needed the width of the tubes at the top to be able to sew them to the trim and to fit them around Francie's thighs. Also I didn't want to take more chances with her knees in an attempt to make the tubes fit tightly around them, so they were wide all the way to the bottom (which gave this project the working title "Francie Dietrich" ;-)).


Next I sewed the two tubes together for the seam between the legs, added two more rows of Herringbone, so they would sit right, and the same trim as on the skirt. Then I pulled the tubes over Francie's legs very carefully and sewed trim to trim with some more beads for the "lace" (that's another idea I may keep in mind for future projects).


Of course my mind is already bustling with ideas to improve the pants design, like making the "skirt" part as short as possible - although it can't be too short as it's not as easy to pull up those tubes with the small gap between the legs AND maybe I'll have to use a little powder the next time because the beads tend to stick on the vinyl - or wider or try a skinny jeans fit after all, but there are other things on my list first.

The next big challenge were the shoes, they always are, not so much in this case because it is impossible to get shoes for Francie, but because it seems right to try and make beaded ones to go with the outfit.
Luckily she has flat feet which called for some kind of slippers and to my surprise it worked out at the first try - with ladder stitch and Herringbone and brick stitch.
The biggest surprise, however, was that you can actually remove the shoes and put them back on. They sit on the feet nicely and won't fall right off. I'll definitely have to keep this design in mind and maybe I'll be able to develop it into a boot design and even adapt it a little for Barbie feet which are made for high heels.


By now I was very relaxed because the most difficult things lay behind me.
All Francie needed was a bracelet because she couldn't go completely without jewelry, a purse and a hat.
The bracelet was quick and easy, just a little peyote strip from the size 15s.


The purse is done in peyote as well. It's sewn up on the sides only, so Francie can open it and put something in there, tissues, a few coins, probably a cell phone. It doesn't have a flap because I started running out of the blue beads. Inspired by genuine vintage Francie purses it has a little strap going through a loop to close it, though.


Last but not least I wanted to give Francie a hat. She has very full hair, but on one side the plugs seem to be filled a little strangely, so the strands of hair keep separating and showing the plugs, even after shampooing and brushing them thoroughly (not to mention that Gundel almost took off with her head that I had left on a shelf while the hair was drying, that would have been very awkward).
I figured a hat would take care of that, but also compliment the outfit. That too is done in peyote technique and picks up the outfit's colors.
Can you believe that I have exactly five beads left over from the blue mix now?


After putting the hat on, I had a vaguely familiar vibe coming from this outfit, and it came to me. While the style is not the same, the purse and hat and pants do remind of a vintage outfit called "Bells" (#1275 from the 1200 series fashions, 1967).

So here she is ... Francie in her brandnew outfit!


Francie, Barbie, and Stacey are registered trademarks of Mattel, Inc. I am not affiliated with Mattel in any way.

6/06/2015

Flower power Hippie time - Part 2, The accessories

Welcome back to the 60s! Today I'll talk about Francie's accessories. And her hair. Which is not quite an accessory.
Let me see, where were we. Right. Francie was dressed now. Have you noticed that there were no shoe problems this time? It wouldn't have been difficult to find shoes for this girl, I might even have something that fits in my little shoe box, but she chose to go barefoot and feel the grass under her feet instead.

What she couldn't do without was a tote bag, and the tote bag couldn't do without fringe. I'm the mad fringer, mwahahaaaa! I wrote about the tote before. The nice thing about a hippie outfit is not being forced to coordinate colors. That way I could use my bead soup and a color that didn't go with anything else so far to brick stitch this tote. I like to think Francie found it in a second hand store.

When I was a child, ball point pens still used to have that little metal ring in the middle where you could unscrew them to put a new ink cartridge in. Sometimes these rings were very thin, sometimes wide. It didn't matter, we used them all as doll bangles.
I had to use two large jump rings here instead.


Now it was time to do something about Francie's bristle head. The original vintage Malibu Francie had long blond hair and that's what I wanted to stick with.
The blond hair I have is called "Sunshine", a great name because it is really shiny.
After weeks of procrastinating I finally mustered the courage to go for it. Rerooting still doesn't come natural to me.
It wasn't easy to pull out the hair plugs and unfortunately Francie already had some small scalp splits, but I did my best to cover those up. I had blond hair everywhere and so did Ponder. He declined my offer to make him a little wig, by the way, but supervised my rerooting with a sharp eye as always.
Here's the result.


After brushing, setting the hair in hot water, giving her a trim and brushing again Francie looked like this. Almost done!


I had always thought I would make a headband as last accessory, but then I wondered if one of those floppy hats would look cool, too. My personal adviser aka my sister, however, had a different idea which I fell in love with right away. She said Francie needed a daisy chain. I had never made one before, but looked it up, and when I found I had beads in my stash that would work, there was no stopping me.
Isn't it perfect for her?


I hadn't planned to make a necklace, but then I was told there had to be a peace sign. Actually my first plan for the tote had been a peace sign pattern, but that didn't work in this size and I didn't want to make it any bigger. So it had to be a necklace after all. This was as small as I could make it with the beads I had. Any smaller and it looked like just a mess of beads. Yes, I tried this more than once.
First I used a copper tone ball chain for the pendant, but that was too big, so I finally settled for a simple chain stitch necklace.

Today I took Francie out to the garden for her first real photo shoot. There's a collage with more pictures at my deviantART if you want to have a look.
You know you want to sing "Let the sunshine in" now or how about "Aquarius"? ;-)


You missed the first post? Here you go!
Part 1, The clothes

6/04/2015

Flower power Hippie time - Part 1, The clothes

From the 20s to the 60s it's quite a time jump, I know. I can't even remember how I decided that I wanted to make a Hippie outfit, I just knew I wanted something completely different from the Flappers this time.
And different it is.

Francie, our lovely doll model this time, is from the Malibu series and was produced from 1971 to 1977. Instead of the regular Francie head she has the smiling Casey head.
This Malibu Francie had seen a very bad hairdresser, one who was even worse than me. He left her with a bunch of bristles on her head instead of a hairdo. Unfortunately that was at a time when I had given up on re-rooting after a few attempts to try other things instead, so Francie spent her life hidden on a shelf behind the door.
Then I re-found her, so-to-speak, and thought she would make a wonderful flower child with her happy smile.

Francie has yet another figure compared to the first two dolls. She is smaller than Barbie - whose cousin she is, by the way - and not as curvy, so I had to make a completely new pattern regarding the arm holes and the straps.

First I made the top. I went browsing tie-dye shirt images on the net and went for a swirly rainbow kind of design. I loomed front and back in once piece, re-wove the threads, sewed up the sides, and then I went totally overboard making a long fringe.


Next came the "leather" vest in a mix of two of my favorite brown bead colors. Other than the top the vest is removable. It has fringe around the top of the arm holes.


I took quite a long break before I tackled the skirt. All I knew was that I wanted to have some kind of denim color, that it was going to be long and wide and that I wanted to pick up the rainbow motif again.
Finally I decided to make it in four parts and sew them together. I used red thread for this to imitate decorative seams.
This was the hardest part. The all-blue parts were pretty boring to loom and instead of going faster because they were easier they almost destroyed my motivation. Joining the parts was okay, but then I had to decrease the top to make the skirt fit on Francie's waist.
At that point I knew it would have been smarter to make the skirt first. The fringe of the top kept getting in my way big time. With gritted teeth and lots of eyerolling I finally got it done.


Then I had the idea for a wide belt in brick stitch. The only problem was what to use for a buckle.
I didn't find a real buckle, but then I had another idea. Yup, sometimes they just roll in like that.
I took one of my toggle clasps and clipped off the little loop. Not bad, eh?


Now I had a complete outfit and only needed some more accessories ... and hair. That's what I am going to tell you about next time.

8/20/2011

For myself

Today I should have ... and then I really should have ... however only after I should have ... and also I could have ... but you know what? I didn't. None of it.
It's so hot today and it's my last weekend. On Earth if it stays that hot. My spaceship is booked already. Yeah, I wish. No, it's the last weekend before it's back work. The least I could do for myself is to have some fun.
This is the result. Francie has a new bead loomed bag. If you know me on other sites, forums etc., you'll start getting annoyed by seeing it, but I can't help it, it was fun and I need to share, so bear with me, please.


9/13/2009

Francie doll goes shopping

About one and a half weeks ago a project that I started went into a totally different direction, like so often.
Out came a line of small and very small baskets crocheted from wire.
When I showed them in my forum, not quite knowing myself what I wanted to do with them except fill them up - with whatever - , Sue, another member, brought up the idea to put wire yarn in there and one of my kitty heads.
The yarn part was easy. This fine silver basket is not even an inch high, I will add a bail if requested, so it's possible to wear it as a pendant or take the bail off, else you can just decorate it.


About the kitty head I wasn't so sure. Two-dimensional was not what I had in mind. What to do? Polymer clay? The last time I played with clay was at a friend's house with his child. Must have been like 15 years ago and my pretzels were not exactly life-like. So what? I went to town and got myself some clay.

I should have known something like that would happen! When "Charlie" was finished, he didn't know anything better than to jump into a basket full of colorful yarn and play with it! And still he has that look on his face "No, Mom, it wasn't me, the yarn attacked first, I had to defend myself!"


Here is Francie, the doll (please Mattel, don't kill me for saying her name out loud), showing the latest fashion in baskets.
She just came home bringing cucumbers, oranges and a bottle of wine (I don't even want to know what kind of supper this is going to be, but everyone to his or her own taste, right?).


Then she remembered she still had to go by the farmer's house and get some eggs for a cake. A big cake, it seems.


To be true, I don't know myself what is going to happen next, but you'll be sure to find the answer here in my blog eventually. It might surprise me just as much as you. Or maybe not. Who knows?