10/21/2023

The Boho mermaid

Some years ago, I fell in love with the tiny Miyuki cubes. I got a whole bunch of colors and used some in wire crochet, some in bead looming and peyote rings.
When I put some bead tubes back into my stash drawers, I noticed tubes with cubes in a silver lined light blue and a matte green with AB finish which vaguely made me think of ocean (possibly having the Moana movie run for background noise influenced that). The green had been around for a long time and the blue was from one of my surprise bead orders.

At first, I didn't think there would be enough beads for earrings and I tried a pendant that I kind of half liked which was not sufficient to keep it, though. I ripped it up again and thought that if I made the folded peyote one bead slimmer than the last pieces, I would have more beads to get to a length which I could bend comfortably for earrings. That was important because the cubes made the strips a bit less flexible than if I had made them with Delicas.

Next I thought about a pattern - one layer or side green, one blue ... checkered ... striped ... but in the end I opted for a random mix for the "ocean waves", waves because the folded and twisted peyote results in a wave shape if you look at it from the side. Also I had less green than blue, so mixing them would help to get long enough peyote strips. In the end I had three blue beads left!
I actually like the contrast between the very shiny blue and the matte green, the effect in light is so pretty, but I wanted more, so I randomly added metallic silver seed beads.

A mermaid - and I just can't help thinking mermaid when thinking of ocean, probably because Andersen's fairy tale has been a (sad) favorite of mine since childhood - could well wear long earrings in her flowing hair.
If that wasn't an excuse to add pearls, I didn't know what would be, and now I feel the earrings have turned boho.


Therefore my question, can a mermaid have a boho style?

10/14/2023

Fall harvest

"You may use any materials you wish and interpret the theme in a way that makes you think of a Fall Harvest."
That's what our Jewelry Artisans Community challenge mistress wrote.
I had a plan almost right away, but was stopped in action because I couldn't find the essential item for said plan.
It's so embarrassing, I started looking for it on August 22 which was when the challenge was posted, I nagged about not finding it on August 27, then again on September 20 announcing that it was driving me nuts, and I found it on September 29 - IN EXACTLY THE PLACE I HAD LOOKED FOR IT THE FIRST DAY AND AT LEAST FIVE TIMES AFTER THAT!! Not mentioning all the other possible spots.
I had been looking for a box in my drawer, but I had already taken the baggie out of the box and thought it was something else.

I know that you can't wait to hear about my plan now.
It includes one of my little wire crochet baskets. No, don't leave! I'm not harvesting yarn.
The mystery item is a cute little Halloween pumpkin from clay (actually there are two, but I only used one).
Sounds like an easy challenge, doesn't it? I harvested a pumpkin from the haunted garden, put him in a little basket and took it home. What will happen there, no one knows yet.

Not that easy, actually. The pumpkin is not a bead, but a charm with a little loop at the top. How was I supposed to attach the little one in the basket if I didn't want to glue him in (which I obviously didn't)?
The only way to do it was to attach him to the handle.
So first I had to work out what size to make the basket, so I could fit the pumpkin in without hiding his face, but also without him slipping out. Then I started wrapping my handle as usual, but added the pumpkin in the last two wrapping cycles. So far, so good.
Now all I needed were some green wire tendrils. If you wonder how a harvested pumpkin manages to wrap all his tendrils around the basket handle, you have obviously forgotten that he comes from the haunted garden.

Next up was the basket filling. I couldn't just let the pumpkin dangle from his tendrils in there, it didn't look right.
After trying it with wire at first, I settled for a nice dark green needle felt cushion instead. You can only see that a little in the picture, but it's actually very important for my little pumpkin to sit on very comfortably.
He sure looks very happy with it :-)

10/13/2023

Green, green, green ....

is all of my clothing ... the words don't work perfectly with the melody of the German children's song I grew up with, but that's ok.
It's an old one from the 19th century and each verse is about a different color and profession.

"Green, green, green is all of my clothing, green, green, green is everything I have. Therefore I love everything that is green because my sweetheart is a hunter."
The other colors are red for the rider, blue for the sailor, black for the chimney sweep, white for the miller, and colorful for the painter.

I had to think of this song when a friend said she had so many clothes in green and would I make her some earrings to go with them?
She chose the beads for the folded peyote and I have to say that the shiny green reminding of beetles' wings was a great choice with the matte green for the inside.

So, what next?

10/06/2023

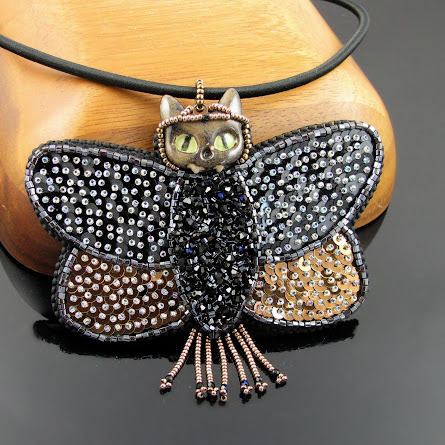
The cat moth

I live on the first floor and sometimes I get little night guests at the window behind my bed. Mostly they are moths, but I've also had grasshoppers stop by which probably live in the plants on the roof terrace above me.
I can never resist attempting to take photos of my visitors, but it's not easy because of the reflection, because of my small old camera, because I can't use flash although it's night, because this particular window is definitely not the cleanest in the house (I hate having to move the bed), and a cat hoping to claw its way through the glass to get to this fun toy also doesn't help. Ponder went completely nuts for visitors and would keep tapping the glass to which all of them have been surprisingly oblivious, some even stayed for an hour.

The other day this beauty came by, let me take a few pictures and then flew back into the night, as if it had just come by for me to admire it shortly.
Its color was kind of a ghostly white, very pretty, but the light of my reading lamp changed that in the picture. I love that I was able to catch the shimmer in the wings a little.


Shortly after that, Heather (my New Zealand artist friend whose cat paintings I use for the HeatherCats) sent me a picture from an Instagram account. koty_vezde edits animal pictures to give them cat heads or faces, with very surprising results at times. My reply was that I would probably have freaked out if my moth visitor had had a cat head, and Heather wrote that I should make a cat moth.
It didn't take a second for me to know that I indeed would do that.
A while ago, I hadn't been able to resist some fabulous ceramic cat heads with fangs although at the time I had no idea at all what to do with them.
Now, however ...

I went right in.
Bead embroidery, obviously.
I couldn't bead a bezel for the cat head, due to its shape, so I could just as well use the loop for the bail construction.
Sequins for the wings, of course.
A sparkly, "fuzzy" body, just because.

I began by drawing on where I wanted the head to go. It wouldn't be glued on completely as the idea of an edging around the ears didn't appeal to me, and I didn't want the ears to get in the way while embroidering the body.
Next I started the body with some old bugle beads that a friend brought me from an American fleamarket, so I knew nothing about them. She got me different kinds and my first choice was a gunmetal, but my needle didn't even go through most of them twice which was very annoying, so I gave up after a few stitches and turned to the other kind instead. They look black, but if you look at them in the light, they are more like a very dark garnet with a luster which makes them sparkle really beautifully. They are not regular, but I think they worked well here, anyway.

For the wings, I decided on two different colors, black (shiny and matte) because it fits a slightly creepy little cat moth and cognac to pick up on the head's color.
After finishing, I felt that the body was too flat next to them, so I generously added black bicones and black-blue firepolished crystals to it. Major sparkle!

Next the head got glued on, and with all the shine and sparkle, I spontaneously decided that this was not just a cat moth, but a magical fairy cat moth who needed a little headdress (I blame Mabel, my muse, she puts things in my brain).
And while I was already going over the top, I couldn't resist tiny dangles (size 15 beads, by the way, that I had to pick bit by bit off a dustpan after somecat threw the bead tube on the floor and the lid came off by itself).
Last but not least I put on a faux leather backing and did an edging. It was tempting to go completely wild with it, but it would have been too much, so it had to be very understated matte black seed beads.

I'll be showing you several pictures to give you an idea of how much the angle changes the color effect and I also have a not so great video to really show you the sparkle.