Showing posts with label stars. Show all posts

11/09/2025

Running under the stars

 Are you still waiting for part 2 of the dress saga or the big hug? Yeah, so am I. If you have been around for a while, you know the reason, so don't be afraid, no whining today.
Let me just say that there is hope because actually one of them "only" needs a chain - "only" because that's something I have always struggled with. I even had necklaces, bracelets or earrings around for years which were missing a clasp or earwires, nothing more. That's really not something I want in this case, but I'm still caught in a sea of indecisiveness at the moment.
Would you like to see the already finished focal or would you rather wait for the completed piece?

The dresses are a different story, that's more because I need a good kick in the butt. Any volunteers?

The problem is that my creative motivation is at a low point. The ideas are piling up in my head, but the execution ... sigh.
My last experiment failed. It was not terrible, but it definitely wasn't good enough.
That's not unusual for my experiments at all. Making mistakes is how I teach myself to do it better (or sometimes give up on an idea). It used to be easier for me to deal with that when I felt I had endless creative time, but these days it feels like wasted time.
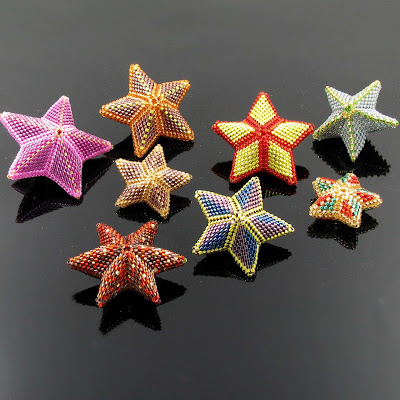
So I decided to do what I have always done when running out of motivation, turn to a trusted design. Usually that would be my miniature wire crochet baskets, but my hands wouldn't tolerate those right now, so I went back to the beaded 3D stars instead.
https://blogger.googleusercontent.com/img/b/R29vZ2xl/AVvXsEhWfcu4qHo20oL5dSVMXDtFDdoyTcJ3EWUhAx4xhcSElAopFlDenbCt5UyR8pELbyeiGWoFXZ_BdLrWeHmXztXPaPWV0NH-Sgm98BnPjrMh89tZG_3DC79jWmgYDKgZtpziypplEVgIRyKxcoT0pbIfvdTS6WP-PYZGQcDohL9s7-Ks2fA0e_UTTxLpyw/s2133/PuffyStars2022.jpg
Some of the stars I made as Christmas
decorations in 2022


The ex was an early bird. An early, early bird. And although I'm very much a night owl I got up at hours when I would usually just fall asleep to take advantage of the ride he'd give me to work. A five minute detour for him, but saving me forty minutes every day compared to the train ride.
Anyhow, I got used to it - not saying I was ever really awake when I arrived at work, though - and in fact I loved the campus at that time. Okay, so it could be a bit spooky being very empty so early, even more so if there was fog - it always made me think of Jack the Ripper - and it's not my favorite kind of architecture, but it gave me the feeling I belonged there.
The best, however, were the little visitors. There's a forest next to the campus, and in the early morning some of the critters come out sitting in the grass between all those big concrete buildings ... mostly rabbits, hares, hedgehogs. There have been fox sightings, but I had never been that lucky.

Picture via pxhere

That memory inspired a pair of earrings.
Let me introduce Nitta who's a ceramic and jewelry artist from Finland.
She first tried ceramics in the 80s in her teens, then forgot it, but started again about eight years ago. A few years later, it became her passion and job and her happy place.
Nature and forest animals are close to Nitta's heart and she thinks that the Finnish forests are probably her biggest inspiration.
Although she doesn't just make adorable critters, with molds or handshaped, they are my favorites, foxes, birds, moths, cat heads (you may remember my cat moth with the little fangs), and more.
 
I'm really trying to hold back buying supplies now that I'm thinking of giving up selling completely, but I couldn't resist Nitta's little hares - or maybe two pairs of them in different colors 😇 They make me think of Watership Down, too (even if those weren't hares, but bunnies).


First, I thought about using more than one color, but then I saw just two hares running along in the shine of golden stars.
The next decision was to use either the hares on the brown or on the greyish-blue background. That was more difficult, but as you see I went for the natural tone in tone look with just a bit of contrast in the loops from beads with one of my favorite coatings (Czech).
I think the hares don't need any more to shine and I'm really happy with them!

10/07/2025

What to do with a hole ... or two ... or three ... - Part 1

The moment had finally arrived, I was ready to embroider on clothing for the first time.
The reason for that was simple. Let me tell you a bit about my life as an eternal non-fashionista who doesn't buy a lot of clothes.

I own the same cotton dress in six different colors with different necklines (and another color in rayon). It has everything I want and really makes me happy - empire style with A-line skirt, midi length, 3/4 sleeves, and pockets! And I got all of them on sale at different times.
They are my clothing workhorses meaning I have been wearing them at home pretty much exclusively for the last year (I got the first one more than two years ago and then went crazy with a sale last year, actually the only clothes I bought at all).
They are comfortable, they have pretty colors, and have I mentioned they have pockets (so perfect)?
Outside I have hardly ever worn dresses, one reason is that my feet had become very intolerant towards cute shoes years ago. So there I wear jeans with longshirts in A-line and with 3/4 sleeves which I also have in several colors.

I know that will sound incredibly boring to some of you, but for me it was great to have found
the one design that really made me happy because it combined everything. Including pockets.
Of course that means those dresses get washed a lot and are also exposed to cat claws a lot.
Which to blame I don't always know - maybe it was even a vegan moth although I doubt it 
😁 - but the tiny holes typical for that kind of jersey started appearing here and there.

Washing machine or cat claw -
we'll never know.

Gundel hates me putting something on her allergy spots (I'm glad it's not necessary often anymore, excuse me while I go knocking on wood violently).
Well, actually it's not so much the gel itself, she simply hates being picked up. Other than Meffi who used to turn into an catopus with a seemingly countless number of clawed tentacles windmilling around when I picked her up, Gundel's claws aim for the first thing to hook into, a cushion, a blanket ... my dress ... and of course it's impossible to get them back out of it because the more you try to help her, the more she will suspect attempted murder and hold on. Then she will take the next chance to escape ... and either dragging the pillow or blanket with her or put a hole in my dress as she can't take me with her (don't advise me to clip her claws, it makes no difference in such life-threatening situations (from her point of view), I know what I'm talking about).
In one case, she was lying on my chest, stretched, hooked in, and when I tried to get her claw out of my dress sleeve, she freaked for no reason, pulled and ran. That one became more of a slit than a hole.

Although I only wear the dresses at home, I of course don't change for accepting deliveries or taking down the trash or even sitting in the garden. So while the holes are mostly tiny and there are only one or two in a dress, it started bugging me and I wanted to do something about them.
I had never tried visible mending before, invisible mending was definitely out (tried it once on a t-shirt and wasn't impressed with myself), but of course I had a box full of embroidery thread.
Before you say something now, I'm aware that embroidery is not the best for clothing that goes through the washing machine all the time (no hand washing these big dresses) even if I use a mild detergent, a net, etc. That's part of the experimenting and I'm completely reckless and ready for repairs or even ripping out. That means of course that I don't plan to be doing super complicated designs. My hands would probably not be up to that, anyway.

My first experiment were some stars, I had found the instructions on the Instagram of pick.and.stitch. Mine are not perfect, far from it, but it was my first attempt on clothing, on a slightly flexible fabric, and because I'm very impatient sometimes, I didn't use a stabilizer for the back (didn't have any yet). Also it seems I suck at transferring patterns.
Instead of using six strands of the floss I did just four because I could use a smaller needle that way which went through the fabric a lot easier and without stretching it even more.

The hardest one was this one because it was so close to the seam. Yes, there was a hole there, I wouldn't have chosen that spot by myself because I knew this would not be a pretty star. I was right.


For one of them I used two colors because one color was wrapped around the paper of the other one and I thought why not. There are no rules.


I also added two to three extra stitches over the centers to attach the top threads. Washing, remember? I did the first wash without net and was positively surprised to see the stars didn't get destroyed right away, not even the biggest one.


Now that I have some stabilizer, I hope the stars will be more regular because I'm sure I will have to add more over time. Also the empty left hand side definitely needs another one right away.
Sorry I didn't manage a better picture, but with the wide skirt and with the stars being so far apart I couldn't do any better than throw the dress over a door and try to get them all in the picture.


I will share the other dresses piece by piece, but so far I have only started one which will take a bit longer and I don't have ideas for the other ones yet.
Hopefully, the cats won't try to assist me by making more holes and turning this into a Sisyphus task!

11/10/2024

Kitty ornaments

Ornament season has started!
Actually though, I won't be making Christmas ornaments this year, except if I want to give one as a gift.
After making so many for my advent calendar last December, but not wanting to take chances with putting any up here in the flat thanks to somecat, I may run into a
space problem in my hallway, anyway ;-)

These two beautiful painted wooden cats made by
Rachel from The Glass Cavern, however - you may remember her from the ammonite in this post - asked to be turned into ornaments.
You can never go wrong with stars, but I don't think they necessarily turn these beauties into ornaments specifically for Christmas, they are still suitable for being hung up throughout the year instead.

About once a year I try to send a parcel with items to a cat rescue for their charity shop and these two will be included this time.
I really hope they will find the right cat people to love them! I know I'm having a hard time letting those cute faces go.


12/14/2023

Paper stars - The fourteenth door


Although this is the fourteenth door, it was one of my last projects for this advent calendar.
I desperately needed something quick and easy for a change. One minute paper stars by Auermedia Arts & Crafts. Now if that didn't sound good, I didn't know what did!
Of course I knew before it was mentioned in the video tutorial that my first star wouldn't be finished in one minute. Or the second. Or the eighteenth if I should ever get that far. It was okay, I was more than ready to put as much as five minutes in per star! ;-)

To make sure I would get at least one good star for this post, I recruited my personal crafts expert, my sister. I packed my little bag with
gold and silver paper cardstock (which it was called when I ordered it, to me it looks more like yellow and grey, shimmering, but not gold and silver, sigh) and heigh-ho, off I went for a little Christmas crafty session.
Our last star crafting had been years ago, using black cardstock that we cut and onto which we then glued bits of colorful transparent paper. The ones my sister made were beautiful, mine were, well, okay, but all of them were used in decorating some of the windows at my job for many years until the tips looked like chewed from all the taping and taking off again, so that session had been time well spent.
I hoped that would be the case again this time.

It was so funny. We both folded the star rather quickly and then cut a part off like instructed. I "opened" what I still had in my hand. Oh no, it all fell apart, total disaster! Until my sister said ... "Wait, the part you put away is the star, you are holding the waste."
Told you I needed her, I don't think I would have noticed, lol!
And to be fair, it was a lot more waste than star which I hadn't expected.

My first star was really crooked. Maybe I hadn't folded it carefully enough, maybe the measurements had been slightly off. Also it almost seemed that the cardstock was a bit too heavy to get that crisp center point done right.
Time for another attempt.

It wasn't too bad, but it wasn't too exciting, either. The center point was a little off, but better than the last. The rays weren't all the same length. The cut edges were a bit ragged which I blame on the folded up cardstock being a tad too thick for my scissors.
I had three options, use thinner paper, get bigger scissors, or let this be a lonely star. I opted for the last one, but thought the lonely star called for some embellishment at least.
First I added some "gold" leaf (you will read more about my first attempt with that in a few days). The cardstock sucked up the gilding milk like der Dekan his kibbles, so I threw on the leaf quite randomly as I had planned to add more, anyway.
Let's stop this here. I didn't like the gold leaf, I didn't like the beads I used next, I hated the whole star and very spontaneously threw it away - before even taking a picture of it. That may give you an idea of how unhappy I was with it.

Now what?
I remembered having some ordinary grey wrapping paper with white snowflakes from years ago - I'm not a gift wrapper - that would probably be too thin, though.
It was. The folding was easier and more regular, but all the folds lost their grey. I tried to cover it a bit with a metallic silver pen and ended up making the whole star silver, actually just so I can show you something at all.
As you can see, the silver is drawn on quite randomly and you see some of the original white snowflakes peeking through (that has to do with the paper's surface), I couldn't do any better and, to be honest, I didn't have any patience left at that point.
In a last minute decision, I glued it to a base - leftover cardstock - that I cut afterwards, so you can see tiny bits of "gold" around the edges. The star is (rather) symmetrical, by the way, it just doesn't look like it because of the angle I took the photo from.


So what have I learned from this one?
These are pretty stars, but
I would probably need the perfect paper or cardstock to make them look nice. And a miracle. Or a lot more than one minute.
Sometimes the truth is hard to take, but I realized that my career is not in origami if I am even struggling with an easy folded star ;-)
I also had to think of my mother who constantly expressed her surprise about my patience with some things and none whatsoever with others. The star is definitely among the latter!

If you are up to trying these, I would love to see pictures :-)

12/04/2023

Pokey bauble - The fourth door


I told you this would be a crafty advent calendar and that means there will not just be beads which sounds a lot easier than it is for me.
To be honest, I have never been the crafty type.
Whenever I think of crafting, the first image that comes to my mind is me sitting at the parish hall, around nine years old, glueing wooden clothespin halves together to make a coaster, and hating every second of it. If I'm not completely wrong, it was the only time I was at that crafting circle.

When browsing through YouTube tutorials for the advent calendar, however, I was glad to see a few that seemed right for my limited skills. Among them were sequined ornaments.
I didn't use a particular tutorial because the basics are actually rather easy. You take a styrofoam ball and pin your sequins on, in whatever way you like, striped, in swirls, combined with glitter or other embellishments ... or you can do it like me.

Doing it like me means that you take a small ball and pin on sequins in waves. Then when you are finished - you have to finish it or you won't bite your table later which is essential for the end result - you decide that you do not like that at all and take all the pins out again. Which takes a little time, but isn't that difficult because you have chosen not to use any glue with the pins (which you don't necessarily have to do, but suddenly it seems safer to you).

So you start all over again, but because you are an idiot, you use a bigger bauble this time, make a few stripes between the "poles" and then despair because the still empty surface seems endless. Because you have small sequins which will take you weeks to put on. Which you could have known beforehand. Doh.
At that point you may get a little dramatic and then think about ordering huge sequins. But wait! You have stars, tiny, small, and bigger ones. That will go much faster, won't it? It might have if you had taken into account that those stars have no holes which means you have to poke some into all of them first. With the tip of your scissors because you couldn't find your pokey tool, and because you only remembered now when writing this post that there is one in your needle felting box ...

This is a tale of poking.
You poke the golden stars that you try to pick out of the baggie while the silver and black ones, especially those tiny buggers, stick to your hands and refuse to come off again easily.
You have to poke the pins through the stars because the holes make it easier, but are still not big enough for the pins.
You dip the pin tips into glue and then poke them into the bauble using the back of your pliers as you still don't own a thimble.

After a while I got into a kind of meditative stupor until I ran out of stars. The forced break while having to wait for more stars to arrive was probably good for my hands and arms.
This ornament has about 5 million pins in it which makes it weigh about 100 kg, but maybe it just feels like that to me ;-) It would bring any Christmas tree down. And it's pokey because of the tips of the stars, hence the title.
It really sparkles like crazy, though. Mission accomplished, but believe me, this one will stay one of a kind.


Oh, and a little extra tip, don't store the bauble in a drawer together with something needle felted or you will picking off fluff forever!

5/18/2023

The moon hare

Believe it or not, but my life with animals did not begin with cats.
Some of our first companions were bunnies, our own, but also guests from the zoo.
The last one was my crazy boy Buster.


As you can see, the love extended to other bunnies as well, and there are more, in metal, as pictures, or in plush, such as this little old Steiff fellow.


It is not surprising that bunnies also made it into my work before, like the needle felted bunnaroo or these bunny siblings.


I could keep going, but it's time to get to the point.
The current challenge at the Jewelry Artisans Community is "Moon and Stars". Perfect for me as a moon lover.

What a lucky coincidence that my last bead order contained some more "moon" cabs, the faceted kind that I had used before, for example in the Moonlight Ravens, but also a few larger cat eye cabs.

I glued on one of the latter and that's when it hit me that a motif I had been wanting to do for a long time was even more perfect for me than just moon and stars - the Moon Hare.

While I learned about the Man in the Moon here, other cultures from Asia to America see the Hare or Rabbit in the Moon. The legends about the Moon Hare vary from country to country, if you are interested, you can find them here. It's really fascinating to read about similiarities and differences.

Now to some other rabbits that I have been fascinated for decades. The story is wild, kind of traumatizing as well, but the ending is beautiful. I'm talking about "Watership Down". I love both the book and the movie although there are scenes that still break my heart. I never fail to cry at the end when Hazel, the chief rabbit, is taken away by El-ahrairah to find peace after a long life.

El-ahrairah was the first rabbit, and although he upset Lord Frith, the creator of the world, he got the gift of speed, cunning, digging, and good hearing.

This is him after receiving that gift (thank you to Nightpaww for the GIF).


Several rabbits I knew were named after the book by us (unforgotten are Blackie Blackavar, the best rabbit mom ever, and sweet little Hyzenthlay) and the inspiration doesn't end there.

This is my bead embroidered Moon Hare.


As you can tell, El-ahrairah has inspired part of it.
By Frith, who has been on my bead looming list for ages, I got inspired to choose a flowing free form for the pendant.


Again, I used the beautiful dark blue hex beads for the night sky and golden AB ones for the stars.
I just love that magical sparkle when moving the piece, and this will definitely not be the last time for the hex beads to turn up in a design of mine.

There, now you know (almost) the whole story behind my love for rabbits and why I not only had fun making this pendant, but also why it brought up a lot of memories from the last 36 years, some of them bittersweet.
While I miss my bunnies (and the rest of the zoo), two cats are quite enough to keep me on my toes and also I wouldn't trust dem Dekan to leave a rabbit alone. So who knows, maybe I will be reviving more memories through my work instead.

12/08/2022

Puffy stars - The eighth door


The things I'm doing for this advent calendar!
For years and years I have been resisting the beaded puffy stars, however pretty they may be, for several reasons.
While I have slowly begun to dip my toe into the waters of off-loom beading more and more (mostly because I still don't trust a certain tabby cat around my loom), I still consider myself to be quite the beginner and creating structural pieces is completely new to me.

Another reason is my lack of patience for video tutorials that are longer than five minutes (which says a lot more about me than about the tutorials!), but also knowing I wouldn't be able to make the stars without one.
Last but definitely not least these stars are made of five components. You know how much I struggle with even making a pair of identical earrings. FIVE identical components??
I know. I could make this much more interesting by going for a more complicated pattern. Excuse me while I am once again laughing madly.

For the sake of finding enough topics for this advent calendar, however, I jumped into the very cold water of puffy peyote stars after all, with two different randomly chosen tutorials, this one by Bronzepony Beaded Jewelry and this one by Off The Beaded Path.
My first attempt came out a little more squishy than intended, but is still pretty.


Then I almost lost my mind over my incredibly simple "pattern" of the first star I did in all-Delicas. I very quickly abandoned the idea of making these as Christmas gifts for our vet practice. Maybe for next year if I make one a month? ;-)

All in all, I'm happy that I tackled this personal challenge and got it out of my system for now.
It's crystal clear to me, however, that I will never make a star with a more complicated pattern or a much bigger star even if in a simple pattern. There are projects that are much more interesting to me.


Nevertheless, I could muster the patience for more than just two stars even if the only reason for that was a phase during which I seriously lacked the motivation to do much else. Stars to the rescue, who would have thought? I only played with colors and small sizes, however, not with patterns. Again, that will not ever happen.
So here's my little collection now. Some became gifts, some went into my decoration after I had taken the pictures for the first day of this calendar.


What became painfully obvious to me again, though, was that I obviously have no natural geometrical understanding at all! I guess my math teachers never stood a chance.

12/13/2018

Oldies but Goodies, More stars - The thirteenth door


There can never be enough stars for my taste, not just for the Christmas time.
I'm going to take it a little easy today. No story, only stars (from the Jewelry Artisans Community Oldies but Goodies Challenge)!


1 and 5 and 7 Cat's Wire
2 RioRita
3 and 4 and 6 MC Stoneworks

12/12/2018

Moravian stars or The glue battle - The twelfth door


Moravian stars or "Herrnhuter Sterne" as they called in Germany were invented more than 160 years ago. The Moravian Church is a Protestant congregation. In 1722 Protestants fled religious persecution from different countries, most of them from Moravia and Bohemia, though, and went to Saxony where some of the refugees established the village Herrnhut which grew quickly (that's only a very short version).
They soon sent missionaries to far away countries. Those often sent their children back home when they had reached school age.
A teacher used stars to teach his pupils geometry, the children then used them for decoration during advent time and passed the tradition on to their families. The first stars were white and red, white standing for purity and red for the blood of Christ.
Nowadays you can get the stars in all kinds of colors, sizes and materials. You can buy them already put together or as a kit, in paper or plastic. Of course you can also make them completely from scratch.

I'm a fool. I thought it would be fun - for you - to see what a kit looks like. I'm not that much of an idiot that I would go for a big one right away because of my glue trauma. I know I suck at glueing. It shows time and again, but I was willing. I bought two mini stars of 13 cm, that's a little over five inch, one blue, one yellow.

Here are the sets in the box and the blue one out of the box. As you can see in the upper left hand corner, Ponder wanted to help me. He changed his mind soon. Probably he was afraid I'd glue him to the star.


Then I did something that doesn't happen often, I read the instructions. Of course there was not much to read, it's pretty self-explanatory. It did tell me to apply the glue sparingly. I knew then I was doomed. Sparingly is not in my vocabulary, simply because I can't do it.
It also said to take seven square points and "stick them along the seam of the body" after sticking the two halves of the body base together (and please imagine me saying "body" like the teacher does in this Mr Bean video ;-)).
I opened the glue and guess what. A big blob of glue with air bubbles attacked me. I was obviously doomed, but still willing.

I'll never read the instructions again. I did my round of seven, but the more points I glued on, the more threads of glue I generously applied over the table (it's a good thing it's so old and worn), on my hands and like a web between the points, and I didn't even know how to hold the star anymore. In between I took little breaks to give the glue time to do its thing, sometimes more inside the point instead of on its edges.


Did there have to be gaps?
Wait. The instructions said "The star assembly kit might be assembled under adult supervision and by children 7 years and older". I'm not really sure I am that old regarding anything glue related ;-)
Finally it was finished, though, and like this it didn't even look that bad (although I am still thinking I'd like to rip everything off and do it over).


I had learned something for the second star, however. Who cares about instructions?
This time I didn't start by going along the seam, instead I worked in rounds from top to bottom. Crazy! ;-) That way I could still hold the star at the bottom. It went like a breeze if you don't count the glue problems (I don't learn that quickly).
While I was working, I remembered that the bigger stars aren't glued at all, by the way, they use pins. Oh well, I wouldn't know where to put it, anyway.


And here's the yellow star now. I did it, yay!


11/29/2018

Art Elements Design Challenge and Blog Hop - Stars

Stars - the topic for the new design challenge at Art Elements. That couldn't be too difficult, could it?
I like stars. Often I have stood outside in the backyard at my sister's place, waiting for my cab and staring into the sky. Seeing them is a bit like looking out over the sea for me. It's this feeling of being completely overwhelmed when I'm trying to grasp infinity and fail every time, but also a feeling of deep admiration and humility.

I like the idea of sparkling stars like those in the tiara shown in Laney's challenge post. I like Grimm's fairy tale of the star-money. I like stars on a Christmas tree or in jewelry.
And I made stars before, crocheted from wire, with clay faces, grumpy, sleeping, even shouting, with beads, with pearls or crystals, with a stone or a clay heart, I bead loomed pendants with stars, often reduced to mere dots in a night sky.
So I wanted to do something different this time, maybe wire weave one or finally try one of those 3D peyote stars.

The things you want, eh?
When I found a baggie of little faceted gemstones in my stash that I had almost forgotten about, all the plans went out the window. I've made a few tiny stars to put on top of tiny Christmas trees for example, so how about some small stars with faceted stones? There were three round stones in the baggie, an amethyst, a citrine and a green quartz which gave me the idea to use different colors for the stars as well, raw copper, a light gold and silver.
Then I put them together as a prototype and wasn't so sure about the colors anymore. Or of the way I put them together. I thought I'd wait and see if it grew on me or if I would maybe like all of them better in fine silver instead (update: this month didn't go like planned, so I'm still not sure about them, still haven't done them in fine silver, didn't put a chain on, but I'll keep you updated if/when that changes - I'm really leaning towards putting them in a row at the moment, but still haven't decided on colors or fine silver).

Here you go. Help me out, what would you do?


Please also visit all the other blog hoppers!

Guests

Jill - Divya - Alysen - Kathy - Tammy - Cat (that's me!) - Samantha - Anita - Karin - Sarajo - Rozantia - Kimberly

AE Team

Jen - Jenny - Niky - Laney - Claire - Cathy - Marsha - Caroline - Susan - Lesley

12/16/2015

Oldies but goodies, Stars - The sixteenth door


To be honest I have never given much thought to the Star of Bethlehem. I guess it was just part of the story for me. There were three wise men and there was a star. If I ever even knew that the star only appeared in the Gospel of Matthew, I am not aware of it anymore.
I have never wondered if it really could have been a star or if it was a comet, a supernova, a conjunction of planets or if that doesn't make any sense at all astronomically. And now that I've browsed a few articles because reading most of them was too overwhelming for a non-astronomically inclined mind like mine, I wouldn't know which snippets to give you because it wouldn't even scratch the surface.
Maybe you want to check out this article if you'd like to know more while I go to things I understand more about like this week's Jewelry Artisans Community Oldies but Goodies Challenge which happens to be about - you guessed it - stars.
I hope you will like my personal selection. I am so in love with this challenge and the items that were shared!


1 Violetmoon's Corner
2 RioRita
3 2 Fab Fristers
4 The Crafty Chimp
5 Cat's Wire
6 MC Stoneworks
7 Jewelry Art by Dawn

12/27/2014

Stars - The twenty-seventh door


Stars are all around in the Christmas season, even more than usual over the year.
When I think of stars and Christmas, I imagine them in or on top of a tree or outside in a cold winter night.

Wire knit and crochet star with bicone crystals by Cat's Wire

The star I want to talk about today, however, is the cymbal star in the church I went to as a child. Back then I didn't know or even think about what cymbals were. All we saw was the little star way up there on the organ with the little bells, not what was behind it. When we sang "O du fröhliche", a German Christmas carol, the star would begin to rotate, the cymbals would start to play, and the special sound that was so exclusive to Christmas made us feel all warm and mushy inside.
Although I haven't heard it in person for many years, the feeling is still there ...


Prototype star pendant by Jewelry Art by Dawn

7/12/2011

Fly me to the moon

Many years ago I watched a documentary about Picasso. He was telling, uhm, stuff that I have forgotten, all I remember is him painting on a panel of glass. He started painting and then he added a bit here and a bit there, then suddenly painted all over it, and although I'm not a big fan of his paintings, I was hypnotized by the painting changing like that all the time. I have forgotten what he started with and I don't remember what it looked like in the end. I do remember there was a rooster at some point.
The fascinating part was how the painting was in motion throughout the process, much more than I had expected.
I'm not Picasso and I'm no painter. I don't know what drove him to work the way he did, maybe I should have listened better.
What I do know is that I'm still fascinated by a design changing all the time unexpectedly.

The July challenge of the Starving Artists Team is "Fly me to the moon". My first thought was a carved polymer clay moon, the second one was moonstones. Half moon. No, full moon. Did I have enough moonstones left? A small full moon made of silver and moonstones. Yeah, with star charms dangling from it. A pendant. Where's my fine silver? Oh yeah, upstairs. Great, now I forgot to bring the charms as well. Wait, what's this? A few leftover moonstones, smaller ones. Stars. The full moon surrounded by night sky. Black wire with moonstone stars. A flat pendant. No, now that I started working with the black wire I feel a domed look is better. How about a double layer edge since the edge started curling so nicely. Hm, know what? Maybe this shouldn't be a pendant at all, it would be a pretty cool ring. Big, but lightweight, and definitely different. On a sterling silver shank.
See what I mean? When looking at the ring now, you won't even know of all the thoughts that come with it, or the time that went into it. I know and it's why I love so much what I do.

And there it is now - in my shop.

12/16/2010

The sixteenth door - Twinkle, twinkle, little star


Let's face it - the most fun I have in winter is sitting inside with some hot chocolate or chai and look outside. If you haven't understood that by now, I guess you haven't read all my advent calendar posts ;-)

The sky in a cold winter night however is something you shouldn't experience from the inside. Why there is a difference for me between a winter and a summer sky I don't know, but half of the fun is feeling the tip of your nose freezing, burying your hands deeply in your coat pockets, inhaling deeply, making your throat burning from the cold air, longing for some hot beverage and look up there ... to feel very small, very humble and thoroughly grateful for being part of this planet when seeing the millions of stars some of which have been gone themselves while their light is still travelling ...

If you insist on staying inside, though, I got some more stars for you. Click on the picture to get taken to the original collection on ArtFire.


7/17/2010

One letter can make a difference

Hermy was excited. He had an invitation for a party and star parties are usually big fun. They had milk from the Milky Way, they talked a lot and danced and it got very late.
The next morning Hermy woke up with a headache from the noise and he still had puffy eyes from not sleeping enough.
What was it his friends and he had been talking about last night? Their future, right. That had been towards the end when all he had finally longed for was his bed.
And what did they want to be? Silent stars, spectacular stars, nope, that wasn't it ... shouting stars! They had even vowed to follow that path with all their little hearts.
So Hermy became a shouting star. Not all his neighbors were happy about it .... if they only had known and could have told him that the friends had vowed to become shooting stars!


You can find more pictures of him in my Zibbet shop.

We had some great rain today. Am I in a silly mood? You can bet on it! ;-)