What is Kimekomi?
A Kimekomi doll is a traditional Japanese doll originating from Kyoto (follow the link for more information).
Kimekomi means "tuck into a groove" which refers to the technique used to dress the doll. Its body is carved from soft wood and has grooves. Fabric pieces are cut and applied to the different segments by tucking their edges into those grooves.
Somewhere along the line, someone used this technique to make tucked fabric balls which was made even easier with the appearance of soft foam pieces, balls, eggs, cones, into which you can cut your own patterns, simple or complicated ones.
I never learned how to sew, so this sounded like a great little project for the advent calendar.
There are many tutorials on YouTube for this technique, I chose this one by Miranda's Ornaments because it shows the very basics.
I used a bigger styrofoam ball because it was already marked at the ends which made it very easy to cut the grooves without even having to draw the lines on. My only tool was an old kitchen knife whose blunt side I could use for tucking in the fabric, being very careful of course, so I wouldn't cut my finger too much with the sharp side - that I could have taped up thinking about it now ...
Well, I survived, the blister on my finger where the knife handle rubbed against it is also gone by now, and although it took me longer than expected because I struggled with the measurements of the fabric pieces, I finally had two very colorful ornaments.
Being a smart Swabian with very little trust in my crafty skills, I had resisted the urge to buy fabric and asked my sister if she had some leftovers for the first attempt. She gave me all kinds of fabric, from purple t-shirt material to metallic blue leather, and a wild pink, red, green, orange, yellow, and golden fabric with perfect stretch for tucking. I made one ornament just from that fabric, for the second one I alternated it with yellow organza onto which I sewed sequins.
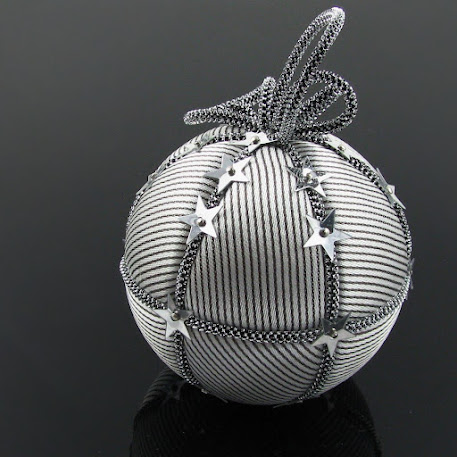
Of course they looked more like summer than Christmas which is the reason for my not showing them here, but now I felt confident enough to use the silver striped satin that had been in the bag. Instead of six segments, I made twelve now by also cutting a horizontal groove all around, and kept turning the fabric, so the stripes would go into a different direction in each segment.
I had ordered some silver/black cord to cover the grooves, but didn't use a hot glue gun like Miranda. Not only do I not have one, but given my relationship with glue, handling hot one doesn't sound like a good idea, anyway.
Instead I used a different glue and also pins to make sure the cord would stay in place. As you can see, the stars that I used in the pokey bauble are back again, in silver this time.
Of course you can use what you like, beads, ribbon, lace, glitter, sequins, and whatever else you can think of, to embellish your ornament.
You can make it in a rustic or fun style, crazy or elegant with velvet for example, use pins with pearl or rhinestone heads, in a simple pattern like me or a more elaborate one.
Give it a try, if I could do this, I bet you can even do better :-)


Amazing! I hadn’t heard of this technique. Your ornament is beautiful.
ReplyDeleteMichelle
Thank you! I had seen them on YouTube before, but it was the first time I really looked into the history of the technique (and ended up in a Japanese fabric store on Etsy which has the perfect brocades for Barbie clothes, but I can't sew and .... sorry, digressing) which fascinated me more than actually making something myself :-D
Delete